
A simple and reliable DIY metal detector. How to make a metal detector with your own hands: principle of operation, diagrams, step-by-step instructions How to make a powerful metal detector at home
Many people mistakenly believe that if they make a metal detector with their own hands, it will be of much worse quality than a factory one. However, a homemade device can be not only better, but also much cheaper than models produced at the factory. Most people who like to look for various treasures are looking for cheap options to save money. Typically, they end up assembling the metal detector themselves.
Operating principles of a metal detector
Beginners at the first stages may be intimidated by various schemes and formulas when assembling them on their own. But if you look for available information on the Internet, you can easily understand all the nuances. Therefore, in order to ultimately get a good device with discrimination, it is necessary to carefully study the various diagrams, instructions and operating principles of the metal detector.
The operating principle of such a device is to use an electromagnetic field. It is created by the transmitter coil after detecting an object that conducts current (mostly all metals). The process is accompanied by characteristic sounds due to the creation of eddy currents and distortion of the EPM coil.
If the found object does not conduct current, but the metal detector still detects it, then this means that it has its own electromagnetic field.
When an object is detected, cheaper devices create a special sound after transmitting information to the control unit. But in expensive factory models, information can also be displayed on the screen.
In order to assemble the device efficiently, you must first study the detailed instructions; Making a metal detector with your own hands is not so easy. Although with the right approach it is quite possible even without special training. Moreover, it is possible to make an underwater vehicle that can search for gold and other precious metals. Although it is unlikely that it will be possible to make a deep metal detector, such devices are manufactured in factories.
The metal detector consists of:

Preparing the PCB
First you need to prepare a printed circuit board, where all the parts and components of the metal detector will subsequently be located. Basically, the method of laser-iron technology (abbr. LUT) is used for this.
At this stage To produce a board, you must follow these steps:

Installing all elements
After the PCB board is ready, it is necessary to solder the circuit elements onto it. They can be taken from old and unnecessary tape recorders, televisions, and radios. But in principle, if the list of necessary parts is ready, then you can buy everything on the radio market. They cost pennies.

The installation process is as follows:
- First you need to install the main chip. You can use the foreign NE555 or the Soviet KR1006VI1, both will do. But problems may arise with domestic ones, since they are no longer manufactured. There should be no problems with a foreign analogue. Before installing the main part, a jumper is soldered underneath it.
- After this, K157UD2 is installed - a two-channel amplifier. It can be found in an old tape recorder.
- Next, capacitors and resistors are mounted.
- At the next stage, you need to solder two transistors like BC557 or analogues.
Metal detector coil assembly
 In order to make a high-quality metal detector with your own hands at home, you need to approach the assembly of the coil with great responsibility.
You can make a homemade coil from a frame with a diameter of 20 centimeters. To create such a frame, you need to take PEV wire 0.5 millimeters in diameter. 25 skeins will be enough. But in any case, the number of turns of wire can either increase or decrease. In order to understand how many of them actually need to be made, for quality work you need to use a coin. The maximum catching distance should be checked.
The speaker that produces the signal can be removed from the portable radio. An important factor is its resistance. It should not be less than 8 ohms. Alternatively, you can use cheap Chinese speakers.
Installation of additional elements
 To configure the device, two potentiometer models of different power are required. One for 100 kOhm, and the second only for 10 kOhm. During operation of the metal detector, interference can often occur. To avoid this result, shielded wire is used to connect the coil and the circuit. But you need to understand that it will not be possible to completely get rid of interference. A minimum 12 V battery is used as the power source for the device.
The stability of the electrical circuit can be increased by additionally using a voltage stabilizer type L7812.
After all the electronic elements are ready, you should begin assembling the frame for the metal detector. But here it is necessary to give only general recommendations, since everyone will assemble it from improvised means.
For beginners we can advise:
- Purchase 5 meters of PVC pipe (which is used in plumbing) to create a rod, as well as a jumper. A special hand rest is installed on top of the pipe. It allows you to feel more comfortable when working. To place the board you need to find any box of appropriate size.
- The device can be powered from a regular battery from a screwdriver. The advantages of using such a battery in its small capacity.
- When creating the body of the structure, you need to take into account that there should be no unnecessary metal elements. They can negatively affect the electromagnetic field of the metal detector.
How to check functionality
A metal detector on a chip can be tested in different ways. First, sensitivity is adjusted using potentiometers. The boundary indicator will be a uniform, very strong crackling. For example, he must find a 5-ruble coin from a distance of 30 centimeters, and a Soviet ruble from 40 centimeters. Large pieces of metal should be detected from a meter or more away.

But on the other hand, he will not be able to find small objects at great depths. Moreover, he will not distinguish between the size of the detected metal and its type. Because of this, when working on such equipment, nails or pieces of unnecessary metal will be a common find.
Many who are interested in the question of how to make a homemade metal detector turn out to be novice treasure hunters who do not have the necessary funds to purchase a factory-made device.
Simple homemade designs
Today there are many ways you can make a metal detector at home, using almost only improvised means. To implement some methods, you need to have special knowledge in the field of electrical engineering, while other options can be used without any knowledge.
Metal detector made from computer disks
There is a lot of information on the Internet on how to make a metal detector from computer CDs or DVDs. The circuit is not complicated, and even a schoolchild can make such a device. To do this, you do not need to have experience with electrical engineering or special tools. Theoretically, you can also make a do-it-yourself metal detector from a phone (cellular or landline) yourself.
The main material used is:

In order to To assemble a working metal detector from these parts, you need to:
- Cut off the plug from the headphones and remove the insulation by 5-10 millimeters.
- Each stripped wire must be divided into two parts. As a result, four parts should be formed.
- A disk must be attached to each wire using glue. If the disc is single-sided, then it needs to be glued to the writing side.
- Additionally, the wires must be secured with electrical tape.
- The remaining separations from the wires must be attached to the plus and minus of the battery.
- Carefully insulate the wires.
- The included calculator should be installed to the CD using electrical tape.
- Place a DVD on top and connect them with tape.
- Attach the battery to the top of the DVD disc with electrical tape.
- Testing phase.
Additionally, you can make a handle for convenient operation of the metal detector. Basically, such metal detectors are used to search for insignificant and small objects, for example, to search for a metal profile in a wall. This device is not suitable for searching for various coins and precious metals, but it is just right for home needs.
Radio receiver as a basis
In practice, they use a good and cheap way to create a metal detector from a radio receiver. This option is no worse than the previous one, but, on the contrary, has increased power.
To create such a metal detector you need:
- a box from an ordinary computer disk;
- radio receiver operating on AM frequency;
- calculator;
- scotch.
These materials should be used as follows:

As you can see from the situation, making a more or less powerful search engine will not be difficult, and will take no more than 5 minutes. This option is for novice users, since it can be done without microcircuits, drawings and the necessary experience in electrical engineering. You can also attach a handle to it for convenient use. The device is ideal for detecting old wiring or metal profiles.
This is one of the most prudent ways to create a metal detector yourself. The decision is up to everyone. On the one hand, there is an opportunity to save up to 5,000 rubles, but on the other hand, homemade devices do not always work as they should.
Even the most serious and respectable citizens feel a slight excitement when they hear the word “treasure”. We literally walk through treasures, of which there are immeasurably many in our land.
But how can you look under the soil layer to know exactly where to dig?
Professional treasure hunters use expensive equipment, the purchase of which can pay for itself after one successful find. Archaeologists, builders, geologists, members of exploration societies use equipment provided by the organization in which they work.
But what about novice treasure hunters on a budget? You can make a metal detector at home with your own hands.
To understand the subject, consider the design and operating principle of the device
Popular metal detectors operate using the properties of electromagnetic induction. Main components:
- transmitter – generator of electromagnetic oscillations
- transmitting coil, receiving coil (in some models the coils are combined for compactness)
- electromagnetic wave receiver
- decoder that separates the useful signal from the general background
- signaling device (indicator).

The generator, using a transmitting coil, creates an electromagnetic field (EMF) around it with specified characteristics. The receiver scans the environment and compares the field indicators with the reference ones. If there are no changes, nothing happens in the circuit.
- When any conductor (any metal) enters the field of action, the basic EMF induces Foucault currents in it. These eddy currents create the object's own electromagnetic field. The receiver detects the distortion of the basic EMF and gives a signal to the indicator (audio or visual alert).
- If the object being examined is not metallic, but has ferromagnetic properties, it will shield the underlying EMF, also causing distortion.
Important! There is a misconception that the soil in which searches are carried out should not be electrically conductive.
This is wrong. The main thing is that the electromagnetic or ferromagnetic properties of the environment and the search objects are different from each other.
That is, against the background of certain characteristics of the EMF generated by the search environment, the field of individual objects will stand out.
Types of metal detectors
Understanding the features of different circuits will help not only to choose a ready-made detector. If you decide to build a metal detector for coins with your own hands, you do not need to install a detector for water pipes or fittings in concrete.
You should initially know what the device is for, since universal metal detectors are expensive, both when purchased and when assembled yourself. In addition, a narrow-profile device is more compact and lightweight.

Main settings
- Search depth. Determines the penetrating power for standard primers: below this band the coil will not respond to artifacts.
- Coverage area: the wider it is, the less time it will take to “comb through”. True, selectivity and sensitivity are reduced.
- Selectivity: selecting the required object from a variety of objects. For example, when searching for gold jewelry on the beach, your device will not respond to steel hairpins or coins.
- Sensitivity: the higher it is, the more likely it is to find small objects. True, the coil reacts to various debris, such as nails or hairpins.
- Noise immunity. The detector sensor is affected by many extraneous factors: thunderstorms, power lines, mobile phones, etc. It is necessary to filter them out.
- Autonomy: this means both energy consumption and battery charge reserve.
- Discrimination is the ability to distinguish artifacts by type. Let's look at this parameter in more detail.
Metal detectors are used to detect invisible objects that, in their electromagnetic properties, differ from the environment in which they are located. Metal detectors are used by amateur archaeologists, geologists, and treasure hunters. These devices are also used by sappers to detect shells, builders to search for metal parts of structures (fittings, pipes...).
Most metal detectors look very similar, but in fact they differ greatly in their properties, and depending on the purpose of use. Here are some photos of commonly used metal detectors. And also a diagram of a simple metal detector.

How do metal detectors work?
The device of the metal detector is quite simple. And you can assemble it with your own hands at home. To do this, you do not need to have deep knowledge of electrical engineering. We have prepared step-by-step instructions for you that will help you assemble an amateur metal detector from available materials.

But first, let's find out what types of metal detectors exist, what properties different models have, and how to choose the right model for you. In order to choose the appropriate type of metal detector, you need to decide what technical characteristics you need.


Here are a few characteristics by which the quality of the device is judged:

Penetration ability of the detector. To what depth does the electromagnetic field of the detector coil penetrate? This determines how deeply the device will “see” metal in the ground or other environment.

Search area covered. Typically, metal detectors examine the soil in stripes. This parameter determines the width of such stripes.


Device sensitivity. This determines whether your metal detector will detect small metal objects (for example, coins).

Detector fragmentation. This function is responsible for the detector's ability to respond only to the desired objects (for example, non-ferrous metals).

Finder immunity to interference. In addition to its own electromagnetic field, the device can enter the electromagnetic fields of other devices. (mobile devices, power lines, radio stations...). The best metal detectors are those that do not respond to fields from other sources.

Energy intensity. How many hours of searching should one battery or battery charge last?


Frequency classification
In addition, metal detectors are classified by operating frequency. Exist:

Metal detectors operating at ultra-low frequencies. Such devices are used only by professionals. They have good technical parameters, but their operation requires tens of watts of energy. Usually installed on special vehicles with high-capacity batteries and equipment that allows you to determine the size, shape and structure of detected objects.

Metal detectors operating in the low frequency range (from 300 Hz to several thousand Hz). Easy to make. Resistant to interference, but have low susceptibility. They are also called deep detectors (“they see” metal at a depth of up to five meters).

Metal detectors with a higher operating frequency range. (up to several tens of KHz). They are more difficult to assemble than low-frequency ones. Their penetrating ability is up to one and a half meters. Detects small objects well. They are rarely used due to their low technical characteristics.

How to assemble a metal detector with your own hands at home
7 simple steps:
- In order to assemble a metal detector, we will need a Chinese radio receiver (must have a magnetic antenna, AM range), a cheap calculator, a box and double-sided tape.
- We unfold the box so that it has the shape of a book (the main part on one side, the lid on the other)
- We glue the radio and calculator to the book with double-sided tape. (the radio is attached to the lid, and the calculator is attached to the base of the box).
- We turn on the receiver and find a frequency segment that is not used by radio stations (about 1.5 MHz).
- Let's start working with the calculator. At the same time, the radio receiver begins to make loud noise.
- We begin to slowly bring the box lid closer to the main part. We need to find a position where the noise disappears.
- We fix the book in this position. Ready! You have made the simplest amateur metal. detector.


Metal detectors with metal discrimination
Among all metal detectors, devices with a discrimination function are considered especially effective. What does it mean?


The metal detector not only shows the presence of an object with a characteristic field in the ground, but also displays on the screen the approximate shape, size and material of the detected object.

Of course, with such a device, work is much more efficient (there is no need to dig the soil with each detector signal) and requires less time. But such metal detectors consume energy very quickly. Plus they are several times more expensive. For an amateur treasure hunter, a cheaper analogue is also suitable.

We hope that our article was useful for you, helped you understand the main types of metal detecting devices, and perhaps even suggested how to make your own amateur metal detector!

Photos of do-it-yourself metal detectors


Metal detectors or metal detectors are a diverse family of measuring instruments, the operation of which is based on differences in the electromagnetic radiation of objects.
Using a metal detector
Professional highly sensitive metal detectors are used in the daily work of various inspection points; they are used to conduct search and investigative activities of police and rescue services.

A huge army of amateur treasure hunters around the world practice long and leisurely hikes with metal detectors. Sometimes such entertainment brings income and even fame.

Nowadays, an industry of detector (recognition) devices has already been established for all occasions, differing not only in operating principles, but also in a wide range of prices and technical characteristics.
Simple magnetic detectors
The operating principle of the simplest metal detector is based on electromagnetic induction - the device contains an electromagnetic coil, which, due to oscillations and distortions of its field, detects nearby electrically conductive and ferrous-magnetic materials, creating an audio or visual signal.

The first experience of assembling a metal detector at home can be the beginning of a serious hobby: new design solutions and even inventions in this field of applied radio electronics are not excluded even at the amateur level.

The diagram shows the structure of a simple low-frequency magnetic detector.

Hundreds of different designs are used in the production of metal detectors. In order to implement one of them yourself, you will need to make a printed circuit board with your own hands, purchase the necessary coils, transistors, resistors, capacitors, etc., and assemble the device.

Metal detector made from improvised means
Another option is to assemble a metal detector from available materials; it is more suitable for humanists and novice technicians with a passion for finding treasures and lost artifacts.

During operation of such a homemade device, electromagnetic waves emitted by the calculator are caught on the AM band of the receiver.

An indicator of the location of an object in this device is the rotation of the electromagnetic field during re-emission, which changes the parameters of the sound signal. A photo of such a do-it-yourself metal detector can be found on the Internet and at the end of our material.

To use such a prefabricated version, you do not need a detailed diagram or assembly instructions, but compliance with certain requirements for the two main components of a homemade detector, namely a properly working calculator and a radio receiver.

Both devices must be from the cheapest category, the receiver must have an AM band and a magnetic antenna, and the calculator must emit pulsed radio interference during operation.

To work on the model, you will also need a suitable sized plastic box with an opening lid, like a book, which will become the body of the finder.

An old CD box is ideal for these purposes. To attach the parts you will need double-sided tape.

Metal detector assembly
- Securing the instruments inside the case: a strip of tape is attached to the back of the instruments, then the calculator is placed at the base of the box, the receiver is on the inside of the lid.
- Setting up the receiver: you need to turn on the receiver at maximum volume and select the upper position of the AM range, free from radio broadcasts and interference.
- Adjusting the calculator: when the calculator is turned on, the receiver should respond with a sharp noise, hum or wheezing; if this does not happen, you need to adjust the range.
- Fixing the position: we begin to smoothly close the box until the sound disappears or becomes more uniform and fix the box doors in this position, using a cube of foam plastic, rubber bands, etc.
- The metal detector is ready. If there is a product with electromagnetic radiation nearby, the receiver will sound an alarm.
By combining elements of other radio devices in a simple detector, you can observe the operating principle of metal detectors in action and enjoy your first search expedition.
Note!


Such a detector, assembled at home, can be tested to search for coins or metal construction debris lying in the surface layer of the earth in almost any area, on any open ground.

Photos of do-it-yourself metal detectors


Note!


Note!


A metal detector is used to search for small metal objects in the soil. But a store-bought product of this kind is quite expensive. To assemble it yourself, it is enough to know the principle of its operation and have a little understanding of electrical engineering.
At the same time, the simplest scheme does not allow determining the type of metal; the discrimination function, in other words, determining the type of find, somewhat complicates the design of the metal detector, but at the same time significantly expands the owner’s capabilities when searching.
To assemble a metal detector with metal discrimination with your own hands, you need to have basic knowledge and be able to work with a soldering iron. The cost of a self-assembled device will be lower than that of a factory-made analogue.
General structure of the metal detector
Metal detectors generally operate on the principle of electromagnetic induction. The transmitting coil generates electromagnetic radiation that penetrates the ground. Reception - receives signals from metal objects located in the ground. Often the functions of both coils are combined into one - a transceiver search coil. The control circuit generates an audible signal indicating that a metal object has entered the search zone; in addition, a visual indicator in the form of a lamp or LCD panel can be used.
Metal detectors are usually assembled according to a classical design and consist of the following main parts:
- search transceiver coil;
- generator of electromagnetic radiation;
- vibration receiver;
- decoder, whose task is to isolate the noise background of an object from the general noise;
- rods on which the equipment is fixed;
- indicator system: sound and visual signaling device.
All elements of the search structure are placed on a bar; the length of the bar is selected based on the anatomical characteristics of the owner.
A discriminator, in other words, a determinant, based on the properties of the object’s material, is usually built into the control circuit; its task is to more accurately determine the characteristics of the find based on disturbances in the electromagnetic field.

Operating principle
The generator creates an electromagnetic field with predetermined characteristics around the search coil. The shape of the field and its depth depend both on the characteristics of the generator and on the shape of the coil itself.
When searching, if there are no disturbances in the electromagnetic field, nothing happens. But when a conductive object enters the electromagnetic field zone, it creates Foucault currents. When a disturbance hits the receiver, it must determine the approximate type of object and transmit information about it to the alarm device. The same story happens when an object with ferromagnetic properties appears in the search field. The characteristics of the soil affect the search field, but at the same time, with the correct settings of the characteristics of the metal detector, more precisely the radiation parameters, this interference can be minimized.
Important! Metal discrimination is one of the functions of a metal detector, which allows you to determine which category a find belongs to. It works by separating the material of an object according to the conductivity of electromagnetic waves. This will eliminate various debris and ferrous metals from the search area.
Self-assembly of a metal detector
There are several working circuits of a metal detector intended for self-assembly: from the simplest “Pirate” type to the more complex “Chance” type, with metal discrimination. The latter is worth talking about in more detail.
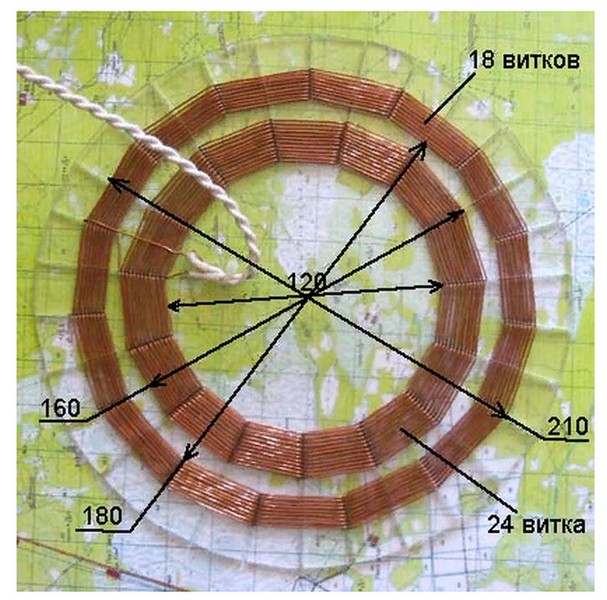
The main thing in any metal detector is the coil. You can use either a factory-made coil from a store or make it yourself. To work, you will need copper winding wire 0.67-0.82.
You can make a simple coil of 90 turns of winding wire for a 100-1200 mm mandrel, but with such a coil design, discrimination will not work correctly. Therefore, it is proposed to assemble a search coil from two windings: an external one with a diameter of 210 mm from 18 turns and an internal one with a diameter of 160 from 24 turns. For ease of manufacture, marking and winding of contours should be done on a plate made of non-magnetic material, for example, plexiglass or thick cardboard.
In addition, it is worth sealing the winding; for this you can use any non-magnetic materials, this will increase the resistance of the metal of the product to moisture.
We'll take the metal detector control unit from Andrey Fedorov. This scheme has already proven itself on the positive side and has been tested many times.
The printed circuit board can also be made independently: from textolite, with a foil pattern applied using the materials provided below. Usually, skills in working with printed circuit boards are sufficient for this. Drawing conductive paths according to a pre-made sketch is a fairly simple process. An iron or a hair dryer is sufficient for this purpose.
Its base is a microprocessor of the ATmega8 type, with a converter of the MCP3201 type. A microcontroller of this type is quite scarce, but despite this, it is sold in a number of online stores. Finding it and purchasing other components will not cause any special problems. Soldering of the control panel is carried out according to the diagram below.

When soldering, you need to carefully monitor the placement of parts and elements on the board. The circuit is quite complex, and the failure of one or two elements will throw all the work down the drain. Don't forget about safety precautions when soldering.
Important! It is worth clarifying that the circuit uses an ICL7660S voltage converter; the letter S indicates that this converter operates with voltages up to 12V. This is what you need to use; when using the ICL7660, the converter may fail due to overheating.
You can download a drawing of the printed circuit board and a full description of the assembly from this link www.miriskateley.com/.
Materials and equipment
To make a coil, a winding wire with a diameter of 0.6-0.8 mm is used; when winding, you need to carefully monitor its condition to prevent damage to the enamel coating. The base is a circle made of non-magnetic, electrically permeable material with a diameter of at least 250 mm.
A complete list of materials used and the possibilities of replacing them with analogues
| Detail | Analogue | Quantity |
|---|---|---|
| NE5534 | 1 | |
| Converter MCP3201 | 1 | |
| ICL7660s converter | 1 | |
| ATMega8 controller | 1 | |
| Zener diode TL431 | 1 | |
| Voltage stabilizer 78l05 | 1 | |
| Quartz at 11.0592 MHz | 1 | |
| Diodes 1N4148 | KD522 | 10 |
| Diode 1N5819 | KD510 | 1 |
| Diodes HER208 | HER207 | 2 |
| Transistors 2SC945 | 5 | |
| Transistors IRF9640 | 2 | |
| Transistors A733 | 2SA733 | 2 |
| Capacitors, ceramics | 13 | |
| Electrolytic capacitors of different ratings | 8 | |
| Resistors | 27 | |
| Buttons art. SWT5 | 6 | |
| LCD QC1602A | 1 |
Programming the control unit
The firmware is installed via a connection to the USB port of a personal computer. Programming is carried out using the “Gromov programmer”; for firmware you need to find on the Internet the free UniProf program from Mikhail Nikolaev.
The latest version of firmware can be downloaded here radiolis.pp.ua.
Any current source with a voltage from 9 to 12 V is used to power the circuit.
Assembly
The metal detector is assembled on a rod; the control unit is conveniently placed in a housing made of high-strength plastic, on its upper part. The coil is fixed at the bottom of the device. To fix it on the rod, it will be enough to fix the coil wires on a non-magnetic base.
It should be noted that high-quality insulation of the wires and the entire control unit from moisture is necessary. The main use of this device is in the field, which is why this issue is so important.
A homemade metal detector of this type is a rather complex device, but at the same time, its assembled cost is somewhat cheaper than its industrially produced counterparts. This product is highly efficient, quite economical in energy consumption, but at the same time has all the necessary functions for finding treasures or metal objects. The discriminator is sufficient to determine metal-non-metal characteristics and identify non-ferrous metals. According to reviews, when using this type of metal detector, a small coin can be found at a depth of up to 20 cm, a steel helmet of the SSh-40 type can be found at a depth of up to half a meter.
Video