
Connecting a pumping station at the dacha. Scheme and sequence of installation of a pumping station
Having your own well and pumping station eliminates the problem of water supply for a house of any size and with any number of residents. After all, a station with suitable power will obtain the required volume of water from any depth. The homeowner only needs to connect the pressure equipment in the correct way. Therefore, in this article we will talk about the most common connection schemes and provide step-by-step instructions for this process.
Design and operating diagram of the pumping station
Typical water supply pumping stations for a private home consist of the following set of basic elements:
- A pressure unit is a pump that lifts water from a well. Its power is calculated based on the length of the pipeline, which consists of vertical and horizontal sections. Moreover, to lift a liquid one meter vertically, the same force is required as to push water along a 10-meter section of a horizontal pipe.
- A hydraulic accumulator is a container with controlled pressure. Water from the well is poured into a hydraulic accumulator, which is connected to the home water supply. Battery volumes are determined based on the number of permanent residents.
- The control unit is a set of sensors and controllers that activate the pump in the event of a drop in pressure in the accumulator.
The operating principle of the pumping station is as follows: the pump lifts water and pumps it into the battery. The control unit monitors the pressure level in the storage tank and turns off the pump after the battery is full. When the consumer opens the tap, the pressure in the accumulator drops. If the pressure drops to a limit controlled by the control unit, the pump turns on again and the whole cycle repeats.
Such a station can be connected to both a well and a well. It is capable of supplying the required volume of water to any home and is designed for round-the-clock operation.
Moreover, the presence of a storage tank (hydraulic accumulator) in the system makes it possible to reduce the load on the pump and optimize the energy consumption of the pressure unit. After all, water is lifted from the well only if the pressure in the tank drops, and its capacity is sufficient for current needs with a large margin. However, the water container included in the design complicates the process of finding the right place to place the station.
Installation location - possible options
Installing the pumping station in the right place will save users from excessive energy consumption and discomfort caused by excessive noise from the pressure unit. Therefore, in most cases, homeowners choose the following 3 station placement options.
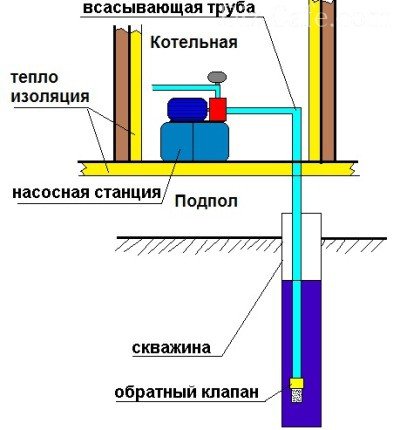
In the basement of the house - this option is justified only if there is a usable basement or cellar arranged within the boundaries of the foundation. The noisy pump is separated from the living quarters by a basement ceiling (the floor of the first floor), and the storage tank is located in an area with a constant positive temperature, which does not require energy to maintain. Therefore, if you have a basement, then you simply will not find a better place to place a pumping station.
In a separate extension to the home - this option is chosen by owners of country houses without a ground floor or basement (cellar). In this case, to supply water to a private house, it is necessary to build not only a water supply system, but also a building for the station. Electricity is installed there, the walls are insulated and a heating device is installed, which is controlled by a thermostat programmed for positive temperatures. Of course, this option will cost more than the basement one.
In a caisson - this placement scheme is an alternative to an extension. In the ground, the walls of which are reinforced with cast rings or a plastic structure. The caisson formed as a result of these actions can be located directly above the well head, at a depth of 2 meters. In this case, we do not need a thermostat - at a depth of 2 meters, the hydraulic tank will not freeze even in the harshest winter. Therefore, an electrical cable and an external branch of the home water supply are inserted into the caisson. And if you do not have a basement, then a caisson is the most suitable option for placing elements of a home water supply system.
After arranging the location of the pumping station, the homeowner can begin to connect the pump to the well.
Connecting the station to a well - step-by-step instructions
For work, performers are required to have physical strength rather than the ability to perform some complex operations.

Well, the connection diagram of the pumping station located in the basement of the house to the well looks like this:
- 1. Determine the location for inserting the external water supply into the house.
- 2. We dig a well in this place 1.5 meters deep and 100 centimeters wide. Moreover, the well should be located close to the foundation of the building.
- 3. We break through the foundation wall (if we are dealing with a strip base) or the plinth wall (if the building has a columnar base).
- 4. We dig a trench from the well near the foundation to the head of the well (or caisson). The depth of the trench is 1.5 meters, width is 50 centimeters.
- 5. Cut one hole in the well casing for the adapter. If the pumping station for a private house is equipped with a remote ejector, then instead of one hole we cut two - for the pressure and circulation pipes.
- 6. We take a polyethylene pipe, the length of which should be equal to the depth of the well (we measure from the adapter) minus one meter. We install a mesh filter and a check valve at one end of this pipe, and at the second - the inner part of the well adapter. If it is necessary to install an ejector, one pipe is not enough - two lines are needed. One of large diameter (usually 32 millimeters) - for rising water. The second one is of small diameter – for circulation. Therefore, the vertical part of the water supply system, immersed in the well, is assembled according to the following scheme: filter, check valve, short section of pipe, ejector, two pipes of different diameters, two adapters.
- 7. Lower the pipe into the water and insert the fitting from the inside of the adapter into the cut hole. In this case, the entire structure is held in the shaft by a rope loop passed under the L-shaped part of the adapter.
- 8. Fix the adapter fitting with a lock nut and mount its outer part.
- 9. We take a polyethylene pipe, the length of which is equal to the distance from the well head to the foundation plus 1.5 meters. We pass this pipe through the hole in the foundation and pull it along the bottom of the trench to the well. To connect the station to the ejector, pull a second pipe nearby of the same length, but of a smaller diameter.
- 10. Connect the pipe/pipes to the well adapter.
- 11. We install a shut-off valve at the opposite end of the horizontal section.
At the very end, we dig a trench and a well at the foundation. At this point, the construction of the outer part of the water pipeline is considered complete.
Connection to water supply - detailed overview
If the site already has a pumping station connected to the well, then even a teenager can connect it to the water supply with his own hands. After all, at this stage the foreman does not need to organize complex and labor-intensive excavation work and pull dozens of meters of heavy pipes through trenches. The whole point of inserting a station into a water supply system is as follows.
An American fitting is mounted on the valve of the external water supply pipe brought into the house. The same fitting is mounted in the side pipe of the station. At the end, a pipe with a diameter of 32 millimeters is thrown between them. Moreover, in the basement of your residence it would be a good idea to install a primary mechanical filter embedded between the valve and the pump. It will reduce the frequency of maintenance of the pressure unit.
Next, a fitting and a valve are screwed into the upper branch pipe of the station, cutting off the hydraulic accumulator from the water supply. After this, an American is placed on the valve, to which a branch leading to the aerator and catalytic filter is connected. These elements purify water from the taste of iron and hydrogen sulfide. For a circulation pump with an external ejector, a tee must be inserted in front of the aerator, diverting the liquid supply line into the well (to the ejector pipe).
Next, the aerator is connected to a fine filter, whose cells are less than 5 micrometers. After this filter, the pipeline goes to a collector that distributes water through the intra-house lines. Finally, the pumping station is connected to the electrical network and a test run is performed. After this, the autonomous home water supply system is considered ready for operation.
Staying outside the city, in a country residence, has additional difficulties, since centralized communications are not available everywhere. Residents of the periphery improve living conditions in a cottage or house so that it does not differ from urban comfortable housing. One of the points of a comfortable life concerns the constant availability of water in sufficient quantities. In this case, special equipment will help - a do-it-yourself pumping station. By installing it yourself, you can save your family budget.
The majority of wells in summer cottages have a depth of up to 20 m – optimal for installing automatic equipment. With these parameters, there is no need to purchase a deep-well pump, an automatic control system or an intermediate tank: water flows directly from the well (or well) to the collection points. To ensure the correct connection of the pumping station, you need to understand what it consists of and how it works.
The main functional units of the station are the following equipment:
- , ensuring the rise of water and its transportation to the house.
- A hydraulic accumulator that softens hydraulic shock. It consists of two parts separated by a membrane.
- Electric motor connected to pressure switch and pump.
- A pressure switch that controls its level in the system. If the pressure drops below a certain parameter, it starts the motor, if there is excess pressure, it turns it off.
- A pressure gauge is a device for determining pressure. It is used to make adjustments.
- A water intake system equipped with a check valve (located in a well or well).
- The main connecting the water intake and the pump.

Using this formula, you can determine the maximum suction depth: the diagram clearly demonstrates what measurements need to be made for this

The most common version of a pumping station is a hydraulic accumulator with a surface pump mounted on top and a unit that includes a pressure gauge, pressure switch and dry-running protection

As can be seen from the table, the cost of pumping stations can vary. It depends on the power, maximum pressure, throughput, manufacturer
Before installing pumping equipment, it is necessary to purchase all functional parts according to the parameters of the well and water supply system.
Self-installation of a pumping station
At first glance, there are quite a lot of places for installing equipment - this is any free corner in the house or outside it. In reality, everything turns out to be different. However, only a well-thought-out installation of a pumping station guarantees its full operation, so some conditions must be observed.
Installation conditions:
- proximity to a well or well ensures stable water absorption;
- the room must be warm, dry and ventilated;
- the location should not be cramped, as maintenance and repair work will be required;
- the room must hide the noise produced by the pumping equipment.

One option for installing a pumping station is on a shelf specially attached to the wall. The installation room is a boiler room, boiler room or utility room.
It is difficult to comply with all the conditions, but it is advisable to adhere to at least some. So, let's look at several suitable installation locations.
Option #1 – room inside the house
A well-insulated boiler room on the territory of the cottage is an ideal area for installation in case of permanent residence. The main disadvantage is good audibility with poor sound insulation of the room.
If the pumping station is located in a separate room of a country house, then it is best to install the well directly under the building
The material on how to make a well water supply system will also be useful:
Option #2 – basement
An underground or basement room can be equipped for the installation of a pumping station, but this should be considered during the design. If there is no heating in the room, and the floors and walls are not insulated, you will have to spend a lot of effort to prepare it.

A well-equipped basement is ideal for installing a pumping station. When laying a pipeline, a hole for communications should be made in the foundation of the house.
Option #3 – special well
A possible option that has a couple of pitfalls. The first is the difficulty of maintaining the required level of pressure in the house, the second is the difficulty of carrying out repair work.

When the pumping station is located in a well, on a specially equipped site, the pressure level should be adjusted, which depends on the power of the equipment and the parameters of the pressure pipe
Option #4 – caisson
A special area near the well exit is also suitable for installation, the main thing is to correctly calculate the depth of its location. The required temperature will be created by the heat of the earth.

The pumping station located in the well caisson has two advantages: complete noise insulation and protection from freezing during frosts
In the absence of specially designated places, the unit is installed in common areas (in the hallway, bathroom, corridor, kitchen), but this is a last resort. The loud noise of the station and comfortable rest are incompatible concepts, so it is better to prepare a separate room for installing a pumping station in the country.
Pipeline laying
The well is usually located near the house. In order for the pumping station to operate properly and without interruptions, it is necessary to ensure the unhindered flow of water from the source to the equipment, which is located in a specially designated area. For this purpose, a pipeline is laid.
Low winter temperatures can cause pipes to freeze, so they are buried in the ground, preferably to a depth below the ground freezing level. Otherwise, the line should be insulated. The work boils down to the following:
- digging a trench with a slight slope towards the well;
- installing a hole in the foundation for the pipe at the optimal height (if necessary);
- pipe laying;
- connecting the pipeline to pumping equipment.
During the construction of the highway, you may encounter a problem such as the presence of high-standing surface water. In this case, the pipes are installed above the critical level, and heat-insulating material or a heating cable are used to protect against cold.

Advantages of polyethylene pipes and fittings over their metal counterparts: lack of corrosion, ease of installation and repair, low price (30-40 rubles/linear meter)

This pumping station installation diagram shows an option for insulating pipes above the ground freezing level

The best option for thermal insulation of external water pipes is a solid “shell” of polystyrene foam (8 cm thick) wrapped in foil
For thermal insulation of pipes that are laid above the ground freezing level, an inexpensive and environmentally friendly material is often used - basalt-based mineral wool.
Exterior works
We attach a metal mesh to the outside of the polypropylene pipe, which will serve as a coarse filter. In addition, you will need a check valve to ensure that the pipe is constantly filled with water.

It is possible to purchase a ready-made hose with a check valve and a coarse filter, but equipped with your own hands will cost much less
Without this part, the pipe will remain empty, therefore, the pump will not be able to pump water. We fix the check valve using a coupling with an external thread. The end of the pipe equipped in this way is placed in the well.

The coarse filter for the supply hose is a metal mesh with a fine mesh. Without it, proper operation of the pumping station is impossible
After completing these steps, you can start upgrading the well head.
Connecting equipment
So, how should you properly connect your home pumping station so as not to encounter technical inconsistencies in the future? First of all, we install the unit on a specially prepared base. It can be brick, concrete or wood. To ensure stability, we screw the legs of the station using anchor bolts.

For installation of the pumping station, special legs-stands are provided; however, to provide additional stability, the equipment must be fixed with bolts
Placing a rubber mat under the equipment can help dampen unnecessary vibrations.

For more convenient maintenance, the pumping station is installed on a base the height of a regular table, made of durable material - concrete, brick
The next step is to connect the pipe coming from the well. Most often this is a polyethylene product with a diameter of 32 mm. To connect, you will need a coupling with an external thread (1 inch), a metal angle with an external thread (1 inch), a check valve with the same diameter, and a straight American tap. We connect all the parts: we secure the pipe with a coupling, and we fix the “American” with a thread.

One of the check valves is located in the well, the second is mounted directly to the pumping station. Both valves serve to protect the system from water hammer and ensure the correct direction of water movement
The second outlet is intended for communication with the water supply network. It is usually located at the top of the equipment. The connection pipes are also made of polyethylene, as it is an inexpensive, flexible, durable material. Fixing occurs in a similar way - using an “American” and a combined coupling (1 inch, angle 90°) with an external thread. First, we screw the “American” to the outlet of the station, then we install a propylene coupling into the tap, and finally we fix the water pipe in the coupling using the soldering method.

To completely seal the connections, they must be sealed. Traditionally, a winding made of flax is used, and a special sealing paste is applied on top of it.
After you have connected the pumping station to the water intake and plumbing system, you need to check the quality of its operation.
We are conducting a test run
Before starting the station, it must be filled with water. We let water through the filler hole so that it fills the accumulator, lines and pump. Open the valves and turn on the power. The engine starts and water begins to fill the pressure pipe until all the air is removed. The pressure will increase until the set value is reached - 1.5-3 atm, then the equipment will automatically turn off.

In some cases it is necessary to adjust the pressure value. To do this, remove the cover from the relay and tighten the nut
As you can see, installing a home pumping station with your own hands is not at all difficult; the main thing is to follow the installation instructions.
And in what cases is it justified to assemble a pumping station from disparate parts that can be bought in a store?
Why assemble the pumping station yourself.
First of all, it seems to me that you should assemble the pumping station yourself if you already have some of its components, usually the most expensive ones. This is a pump and a hydraulic accumulator. Because the cost of the pump is approximately half the cost of the pumping station, respectively, the hydraulic accumulator is approximately a third. That is, it makes no sense to buy a new pumping station if your accumulator is crushed in winter or the pump burns out for some reason. You can buy both separately and simply replace what is broken; fortunately, the pump fasteners and the hydraulic accumulator mounting platform are usually standard and you can connect one to the other without much difficulty.
Another reason to assemble a pumping station yourself may be a discrepancy between your requirements and the characteristics of the equipment of the finished pumping station. For example, you need a pump with higher pressure or water flow than the pumping stations offered to you, and what suits you in terms of characteristics does not suit you in terms of cost or reliability. Either the dimensions of the pumping station are too large for the place where you are going, or you are not satisfied with the capacity of the hydraulic accumulator, well, etc. You just need to keep in mind that the final cost of the pumping station may well be much more than what you planned.
The third, most common option is when you are forced to assemble a distributed pumping station due to very... As a rule, in this case, a powerful submersible pump is used, and a hydraulic accumulator with an automation unit is installed somewhere at home.
Is a hydraulic accumulator really necessary?
A reasonable question: is it possible to do without a hydraulic accumulator? In principle, this is possible, but with a conventional automation unit the pump will turn on and off very often, reacting even to insignificant water flow. After all, the amount of water in the pressure pipeline is small, and the slightest flow of water will lead to a rapid drop in pressure and an equally rapid increase when the pump is turned on. It is precisely so that the pump does not turn on every time you “sneeze” that they install a hydraulic accumulator, at least a small one. Since water is an incompressible substance, air is pumped into the accumulator, which, unlike water, is highly compressible and acts as a kind of damper that regulates the accumulation and flow of water. If there is no air in the accumulator or too little air, then there will be nothing to compress, that is, there will be no accumulation of water.
Ideally, the capacity of hydraulic accumulators should be only slightly less than the debit of your water source, and the pump, in this case, will turn on only when some fairly decent supply of water has been used up, i.e. very rarely, but for a long time. But then it will be very expensive.
Now pumping stations with improved automation units with built-in dry-running protection have appeared on sale, which smoothly start and stop the pump and regulate its power depending on the set pressure. It is believed that, in principle, they do not need a hydraulic accumulator. But all this works well only in the absence of voltage surges, which our outback and holiday villages cannot boast of. And, unfortunately, stabilizers do not always save you from this disaster. In addition, the price of such a station is very often much higher than usual, which, it seems to me, does not justify itself.
Ready-made automation systems.
Wistan.
Of all the ready-made automation systems for pumping stations, our domestic development Vistan, designed exclusively for organizing a pumping station based on a vibration pump, especially stands out. I am not a supporter of the use of vibration pumps in water supply systems of private and country houses, but I cannot help but pay attention to this device due to the great popularity of “Kids”, “Rucheykov”, etc. in the post-Soviet space.

There are a lot of flattering reviews about this device on the Internet. In life, unfortunately, not everything is so rosy. So, in short.
Advantages:
— Special development for vibration pumps;
— Automatically maintains the pressure in the system at 1.5-2.0 bar;
— Has built-in protection against dry running;
— Has a built-in voltage stabilizer, can work with voltage from 160 to 250 Volts;
— Can work without a hydraulic accumulator, smoothly changes the pump power;
— Smooth start and stop of the pump;
— Has overcurrent protection: 5 Ampere fuse;
— Automatically resumes operation when the parameters are restored: network voltage, the appearance of water pressure at the pump pressure (dry running).
— Easy to install and dismantle the circuit: the manufacturer recommends using a ½-inch flexible liner.
Flaws:
— The pump must create a pressure at the inlet to the device of at least 3.0 bar: not every vibration pump is capable of this, given the difference in height between the water surface in the well (well) and the location of the Wistan.
— Water flow is limited by the internal cross-section of the flexible line, or you need to install a hydraulic accumulator.
— Dry running protection is solved in a unique way: the device turns off the pump if the inlet pressure does not rise above 0.8 bar in 10 seconds. Those. There is actually water, and the pump pumps it properly, it just doesn’t have enough strength to raise the pressure to the required level.
— There is no way to regulate the pressure in the system.
— High price of the device compared to the cost of vibration pumps. The cost of the “Wistan + pump” set is comparable to the cost of a ready-made pumping station, which is not of the poorest quality (and the Chinese ones are one and a half times cheaper).
In general, this option for organizing a pumping station is suitable for summer residents who are accustomed to their vibration pumps and are not spoiled by the benefits of civilization in the country. In addition, the system is easy to assemble in the spring before use and disassemble in the fall, taking the entire household with you to the city and without fear of it being stolen or torn apart by frost. For a more serious water supply system at home, this device, like its use, is unlikely to be suitable.
Automation unit for centrifugal pumps.
 To organize a pumping station based on, no matter submersible or surface, an automation unit is required. The simplest thing is to assemble it yourself using purchased elements: a manifold, a pressure switch, a pressure gauge. But you can also buy a ready-made unit on which all this will already be installed. All that remains is to install it on the pump head in a place convenient for maintenance.
Various companies offer a wide variety of such blocks, differing in configuration and cost. The simplest and most inexpensive ones include only the necessary elements mentioned above. Blocks that have a dry-running sensor added will cost a little more. The most sophisticated are the automation units, which independently, by adjusting the power of the pump, maintain the set pressure in the system, and also have several (up to three) protections against various unpleasant things (dry running, pump overload, rupture of the pressure pipeline).

Collector.
Actually, everyone is free to make their own choice. For some it is easier to assemble such a block themselves, for others it is easier to buy it. It seems to me that the only drawback of such blocks, besides the price, is their block nature. Those. If something breaks as part of such an automation unit, then the entire unit will have to be replaced, and this can sometimes be expensive.
Schemes of pumping stations.
 The most common scheme of a pumping station is when all its elements are assembled together, as one reader wrote: “pump on a barrel.” In this case, the automation unit is placed at the pump head, and water is directed to the hydraulic accumulator through a separate pipe or flexible connection. It turns out that you can install a pump and a hydraulic accumulator (HA) in different places by simply replacing the outlet to the HA with a longer one.
 But the best option would be to install the automation unit on the GA by connecting the unit’s manifold to the pump with a pipe. Then we get a distributed pumping station, where the pump can be located, for example, in a well (or in a well for a submersible pump), and the HA is located in a warm house.
 Continuing to improve our scheme, we can find the most convenient place for the automation unit. I imagine such a place is the cold water distribution manifold, where the automation unit will maintain constant pressure (after all, this is exactly what we need). The hydraulic accumulator, in this case, can be placed under the bathtub or in any other free place in the bathroom, and a pressure pipeline will be connected to the pump. The pump itself can be placed closer to the source of water supply and away from the house, so as not to hear its noise, or you can buy a submersible pump (again, no noise in the house).
Thus, by placing the elements of the pumping station in those places where it is convenient and not conspicuous, you will receive maximum comfort during operation: “like in an apartment.” The main thing is not to forget what and where you stuffed it.
You may be interested in similar materials::
- The question seems simple only at first glance. In order to find a place for a pumping station, I mean a pumping station...
- A pumping station is no longer just a pump with an electric motor, it is a set of equipment designed to supply water from a well, well and...
- Hello, dear readers of “San Samych”. It seems to me that there is no need to repeat the truism that the pump is the “heart” of the water supply system...
Reviews (325) on “We assemble the pumping station ourselves.”
Hello, Ruslan.
If the noise level of the pump is critical to you, then centrifugal ones without an ejector are best suited for your design (with such a flat body, as if a pancake with legs was attached to the engine, with a suction hole exactly in the middle of the pancake). Their main source of noise is the engine itself. It’s just that it’s very difficult to select a pump based on their characteristics.
The fact is that such pumps, as a rule, have a very high flow rate (performance) at a low pressure. Those. a flow rate of 100 liters per minute at a head of 20-25 meters is normal for such pumps. However, they are reliable, are not afraid of “dry running” (with a brass wheel) and are almost insensitive to changes in consumption, i.e. almost always give the same pressure.The second noisiest, but more appropriate in terms of characteristics, is a pump with a built-in “short” ejector with a cast iron or plastic body. In appearance, the body resembles a hemisphere with two holes or pipes. In it, together with the engine, the pump begins to make noise, namely, the noise of the water circulating in the ejector (mid-frequency noise with high-frequency harmonics), plus low-frequency vibrations (noise) created by the movement of water in the impeller. Overall quite quiet and not annoying.
Accordingly, the “longer” the built-in ejector, the more mid-frequency noise is added due to the longer path of water along the narrowing of the ejector. And it is this noise that begins to irritate. These are the next noisiest pumps with an elongated cast iron casing.
If the body is made of stainless steel (beautiful, of course), then the resonant frequencies of its thin metal “come into play.” However, the better the pump, the less disgusting they are.
Well, vortex pumps, as you correctly noted, squeal when pressure builds up.Another quiet option: install two circulation pumps with a “wet” rotor in a series connection, but with pressures of at least 15 meters (this is rare, but you can find it). Just under no circumstances should they be vortex-type (although what does a “wet rotor” have to do with it?) In this combination, even the engines will hum very quietly. You won't hear the pumps at all.
Nothing, Ruslan. Only the greater the maximum nominal flow rate of the pump, the greater the minimum required flow rate through it without the occurrence of cavitation, and in the limit of the occurrence of “dry” running. Cavitation itself is more or less dangerous for a pump made of any material. The “softer” the material, the more dangerous: the faster erosion of the impeller will reduce the performance of the pump. Typically, the minimum flow rate through a household pump is 0.6 m3/hour. This is 10 liters per minute. And this is another reason for using GA in autonomous water supply systems.
Basically, cavitation heating (the main consequence of “dry running”) is dangerous for plastic pump parts. This is most often a built-in ejector, but it can also be an impeller. Therefore, to minimize the effects of cavitation heating, as a result of minimal flow through the pump, all pump parts must be made, at a minimum, of metal.
By the way, vortex pumps have a different problem. It is not cavitation that is to blame, but abrasives contained in any water. They grind off the pressure separating ridge inside the pump housing. Accordingly, both pressure and flow decrease over time.All this is both true and not true at the same time, Ruslan. When discussing such subtleties, details are very important. And the most important thing is that you need to consider the operation of the SYSTEM, and not a separate PUMP. In short...
And if we consider the operation of a serviceable, correctly configured system, then... “if you open the tap slightly, then...”
1. Water will flow not from the pump, but from the HA, until the pressure in the system becomes equal to the pump activation pressure.
2. RD turns on the pump.
3. The pump lifts water from the source, pumping it into the system.
4. Part of the water goes directly to the “slightly” open tap, the other part goes to replenish supplies in the GA. At the same time, the pressure in the system rises (if the total flow through the tap and in the gas pump is less than the pump capacity).
5. The RD turns off the pump when the pressure in the system becomes equal to the shutdown pressure.
If the tap remains “slightly” open, the cycle repeats.
And now - the nuances:
1. Even in this cycle, with a working and correctly configured system, with a correctly selected pump, for several seconds before turning off the pump operates in a critical mode, with the formation of cavitation or close to it. In general, it's not scary.
2. If the pump’s performance is so high that the number of cycles per minute is more than two, then the pump (and the engine) do not have time to cool down after critical conditions. For an engine this is a start-up, for a pump it is a cavitation mode before stopping.
3. If the system is faulty or incorrectly configured, the duration and (or) frequency of critical modes can increase multiple times, up to constant “dry” running and (or) very frequent switching on and off of the pump, and, as a result, failure of the pump.Therefore, it is so important to select the equipment CORRECTLY (or close to it) and configure the SYSTEM for long (and happy) operation of all its elements.
Greetings, Ruslan.
Actually, the answers (sorry, but I don’t have much time right now):
1. You did everything right. Otherwise, hot water will flow with much less pressure. You will have to constantly adjust the adjustment on the mixer. There is no need to take into account the additional length of the “cold end”. Calculations need to be made only for the longest pipe.
2. Kalpeda are very good pumps.
3. Passport costs and pressures are relative concepts. Actual flow rates and pressures may vary greatly from those stated due to system conditions. As you correctly noted last time, the pump will not be able to produce more than what flows from the tap.
In your case, pauses will be sufficient due to the capacity of the HA, the consumption of which will be at least about 1-2 minutes. Then, perhaps, the pump will pump up the HA in half a minute or a minute. In general, these are quite acceptable operating conditions for the pump. In reality, most likely, the pause time and pump operation will be longer.
Or, if you are asking about additional water collection points, then, of course, it is possible. With such pump parameters, you will have a very large flow reserve at the maximum possible pressure.Hello, Sergey.
No, it shouldn't be like that. And this is a consequence of the installation of two automation systems, possibly operating on different principles of turning the pump on and off. I wonder how your pump is connected to these systems electrically: in series or in parallel? Most likely, in parallel. And these 20-30 seconds of break arose due to the difference in the automation settings.
What to do?
It is necessary to remove one of the automation systems. And depending on which system you remove, or rather, on what principle the remaining one will work, you may have to change the general scheme.
If you leave the pressure switch, you won't have to change anything. It operates from the pressure in the system, and it doesn’t matter where it stands, as long as it’s after the pump.
If you leave an automation unit, which possibly works by measuring water flow and (or) pressure, then it must be placed between the pump and the hydraulic accumulator (HA) in the direction of water movement, so that the automation “feels” the filling of the HA and stops the pump only after the flow stops .
Although, in fairness, it must be said that if the system has a sufficiently powerful pump, then the result may be the same on-off cycle: First, water is consumed from the gas pump, the pressure drops, the automation (pressure switch) turns on the pump, it pumps to the consumer, and in the HA until the pressure rises to the cut-off pressure. Then the cycle repeats.
If the automation unit operates on a flow, then it will not turn off the pump as long as there is flow to the consumer and (or) the gas pump. But again, if there is no pressure limit.Hello, Semyon.
The presence or absence of a hydraulic accumulator (HA) in the system depends on the type of automation being installed, and only on it.GA is definitely needed when used in a mechanical pressure switch (MPS) system.
It is not necessary to install a GA (but it is possible, and in some cases, desirable) if the system uses automation with a smooth (discrete) engine start system.
As a rule, electronic control units (ECUs) already include a dry-running protection system, a small GA (from 0.4 to 1.0 liters) with a spring membrane and a smooth (discrete, i.e. stepwise) engine start system, limiting the starting current of the motor. The exception is blocks based on the same RDM, which, in fact, are not ECUs.It is not necessary to install a GA (but it is still possible, and only in some cases it is harmful) if the system uses inverter automation with the function of maintaining the pump engine speed required for the system to operate.
The specifics depend on the device, principle and algorithm of operation of the specific automation.
Hello Svetlana.
Yes, you can. But the automation must be special, not a simple pressure switch (RPM). And an automation unit with flow control according to some principle (float, impeller, etc.). Accordingly, with protection against dry running, and, preferably, control and adjustment of upper and lower pressure. For example, Gilex 9001 (float, 0.7 liter HA, pressure adjustment), AquaRobot TurbiPress 1.5 (impeller, shutdown when flow stops, no adjustments), PressControl from Aquario or Pedrollo (float, HA, adjustments ), BRIO-5, BRIO-2000 from ItalTekhnika and others like that.
Hello,
Great site. I found the information I've been looking for for a long time
Please help me decide on a pump. We are talking about the water supply of a country house. The system has been working for about 20 years without problems, however, everything becomes unusable. The house has a 500 liter storage tank, which is filled from a well (small debit) by a pump automatically. Next OK-NS (saer tk1, RD and ha included) - shower, sink, toilet, kitchen. Last year the GA broke. I changed it to a larger 50L. The result is a scheme OK-NS+RD-GA-water intake. However, the pump does not pump more than 1.8 atm. I decided to change the pump, it worked. I just can’t decide which one to choose - vortex or centrifugal. As I understand it, with this scheme, self-priming is not necessary (the pump is below the tank and will fill itself with water). The old pump seemed to cope (saer-kf1). But the question is about noise. As you wrote correctly, the old vortex squeals and is not particularly comfortable at night, but how will the centrifugal one behave under such a scheme? And is it worth installing a more powerful pump? I read somewhere that when the voltage drops, a weak pump cannot cope.
Thank you very much for your answer. Stupid question. What's wrong with high consumption? After all, more than will spill through the tap. I don't need a lot of pressure. Vertically a maximum of 2 meters and horizontally a maximum of 20.
Vadim, thank you.
Now it’s more or less clear. It turns out that if you open the tap slightly, cavitation will occur. But shouldn't the RD turn off the pump in this case? After all, as I understand it, the pressure will rise sharply. Or will this lead to frequent switching on/off? Or am I misunderstanding?
Thank you. I apologize for perhaps stupid questions.
Vadim, thanks for the clarification.
Please forgive me for being so meticulous, but I want to ask a couple more questions.
1. I calculated the pump as shown in the article on the website. The pressure turned out to be 25 meters. My system is installed in such a way that the length of the cold water pipe to the farthest point of disassembly is almost 2 times shorter than the hot water pipe running through the water heater. To calculate the horizontal section, I took only the length of the hot end (as the longest). Is this correct, or should we also take into account the cold end?
2. The search for a centrifugal pump that produces a flow rate of about 24 l/min turned out to be almost in vain. As you wrote, the majority either do not have the required pressure, or the flow rate at such pressure is much more than required. The only thing that seems to be close is Calpeda NM 2. The flow rate is about 40 l/min at a pressure of 25 meters. Will it be possible to use it, or is it too much (GA in the system is 50 liters, the pump is located half a meter from the tank, below the intake level)?
Thank you in advance.
Hello.
Good article.
My station is assembled according to the following scheme: well-return valve-pump-accumulator-pressure switch-automation unit.
And here’s the peculiarity: first, after switching on, the pump works for about 1-2 minutes, then a break for 20-30 seconds, and again it works with good pressure.
It seems that it first uses up the reserve in the battery, then accumulates water and repeats the cycle again.
It should be?
Or maybe remove the extra pressure switch?
Or incorrect assembly diagram?
Good evening, please help me with the choice. Private house, city water supply, no water pressure (no water pressure at all), washing machine washes, you have to interrupt the program, good times are not clear when they will come, we decided to install a storage tank of 500 liters. Question at the pumping station, is a hydraulic accumulator needed, I read a lot, principle the work is clear, in stores they say that you only need a pump and automation, but I am tormented by doubts, maybe with GA, analysis into 5-6 points, the site is informative, thanks for your efforts. THANK YOU IN ADVANCE, sorry for the long wording
Hello. I have a centrifugal water flow pump in my well. Tell me, is it possible to install only an automation unit in the house? (Without hydrophore) The pressure is very strong. And there is no storage capacity. And create a branch for the washing machine and sink?
Artem is right. 220V is supplied to the RD, from there to Gilex, and then to the pump.
Everything is controlled from the taxiway. and the flow sensor restarts every time the RD is turned on. One BUT: the pressure setting on the automation unit should be noticeably higher than on the RD. Those. The automation is involved in operation only along the flow path and protects the pump from dry running. Everything has been OK for me for several years now.
It is not always possible to use a centralized water supply, especially if the housing is somewhat remote from the city. But sometimes you have to connect special equipment, such as a pumping station for a home, the connection diagram of which depends on the operating conditions and parameters of the water source (well, well), and in conditions of insufficient water pressure from the central pipeline.
The most important, main components are the pump unit itself and the storage tank. Depending on the design, the mechanism is controlled by an automation unit or a float element. As a result, it turns out that each of the operating nodes is found in different versions. For example, the drive exists in the form of a hydraulic accumulator and a tank. The pumping unit itself may or may not be equipped with an ejector. Moreover, the first of these options can be made with a built-in or external ejector.
Devices with a storage tank have a long list of disadvantages, including the main ones: large dimensions, and therefore difficulties during installation, as well as the lack of forced action on water, which does not contribute to an increase in pressure in the system.
The most common versions today are those with a hydraulic accumulator.. The principle of their operation is based on the features of the main unit, which is divided inside the cavity into two compartments. Both of them are responsible for different functions: pumping air or water.
The pressure level is monitored by a relay, which turns off the device when the pressure reaches a certain level. If the value of this parameter drops to the minimum limit, the relay is activated and the device is put into operation. Despite its popularity, this type of equipment also has its drawbacks, in particular, the tank is not very spacious.
 with hydraulic accumulator
 Basic criteria for choosing a device
Installation of a pumping station in a private house is preceded by careful selection of the most suitable model. Among all the functions, including the least important ones, you should first of all pay attention to the following:
- the suction depth of the device, which must correspond to the parameters of the well itself, because if these parameters are met, as well as with sufficient power, the highest level of productivity can be obtained;
- water supply speed, also known as productivity;
- power of the device, but you should not choose a model with the largest margin for this parameter, as this will lead to unnecessarily high energy consumption;
- type of device control: manual drive or automatic;
- the number of people who will use such a water supply system in the future;
- tank volume, which will allow you to use the device for a long time without connecting to the mains.
If we talk about the performance of the device itself, then this parameter will never should not exceed the natural productivity of the water source(wells, wells). If these characteristics do not match, the liquid will be pumped with impurities.
A do-it-yourself pumping station for a dacha is connected based on some information about the composition of the family. So, if the power of the device is not sufficient to provide the required speed of pumping water, then there will not be enough water in the system to supply a large number of people living in the house, which will lead to a weakening of the pressure and uninterrupted operation of the device.
For example, in order for a family of 4 to be able to use a local water supply system, a device performance level of approximately 3 cubic meters is required. m/h, however, this figure may vary depending on the level of intensity of water use.
The principle of choosing a site for installation

The main disadvantage of pumping stations is the impossibility of using them during the cold season in unheated rooms or in open areas. It happens that users organize additional heating for devices standing on the surface of the earth, protected only by primitive construction. In this case, of course, there will be some effect from such actions, but in reality the result will only be excessive fuel consumption (if an liquid fuel heater is used, for example).
For more efficient and economical use of such units, before connecting a pumping station in a country house or in a private house, it is recommended to adhere to a number of rules:
- the location for installing pumping equipment should be chosen taking into account the possibility of installing a centralized heating system, and the presence of energy sources in the room is not desirable;
- It is recommended to organize free access to the device, which will simplify maintenance even in the event of equipment failure;
- professionals advise install such equipment as close to the water source as possible(well, well).

As you can see, if you plan to purchase such equipment, the connection diagram for a pumping station for a home or cottage from a well or should cover all possible features, up to the organization of a special room for these needs.
Choosing a system: one-pipe or two-pipe?
In total, there are two options for connecting equipment of this kind, each of which requires the need to take into account several parameters: the installation depth of the equipment, the configuration of the water supply. Thus, a distinction is made between one-pipe and two-pipe systems for connecting pumping equipment. In the first case, we are talking about shallow depths, while the second option is usually used to increase the depth of water suction by a pump from a well.
More specifically, some boundaries can be noted for both cases. For a one-pipe system, a threshold of up to 8 m depth is sufficient, for a two-pipe system – from 8 m or more. Moreover, the second option assumes use of pumping equipment with an external ejector.
How to connect to a water source (well, borehole)
Usually the location of the well is in close proximity to the home, which greatly simplifies the extraction of water and its supply to the house for the general needs of the family. Accordingly, you will not have to dig an endless trench to lay a pipeline, which is one of the main links in the chain of organizing local water supply using a pumping unit. Main works:
- Preparation of trenches, which are made at a depth below the soil freezing level and with a slight slope towards the water source to increase the efficiency of equipment operation and water supply to the site.
- Preparation of a polyethylene pipe with a diameter of 32 mm from a well (well) for connection with pumping equipment. At this stage, a check valve and a mesh are mounted on its end part. Moreover, installing a pumping station in a dacha with your own hands does not necessarily have to imply independent fastening of these elements, since it is quite possible to purchase a ready-made pipe with a check valve connected to it and a coarse filter (also known as a mesh).
- Connection to the pump unit is made using a coupling, a metal angle with a thread.
- Next, the pipe leading to the water supply is connected to the pumping equipment according to the principle described above, using a combined coupling with an angle of 90 degrees and an “American” one.
- Before the first start, water is first poured into the pump unit through a special hole.
A detailed connection diagram of the pumping station is shown in the photo.

Organization of connection to the water supply
When connecting a pumping station to a central water supply, connecting elements (fittings) are also used. A connecting element is attached to each of the holes (inlet and outlet), providing a hermetically sealed fastening of the pipeline. The pipeline from the pumping station is connected to the water supply using a special insert or tee.
For better water purification It is recommended to install two filter elements: coarse and deep cleaning. Moreover, there are some nuances when installing such parts. Before connecting to the internal water supply, a deep cleaning filter is installed, and a coarse filter element is mounted at the inlet of the pumping station. After fastening all the elements, the equipment is started.
Thus, in total, not much work needs to be done at the stage of connecting a pumping station for a summer house and home, but it is the preparation that takes more time, for example, digging trenches for laying a pipeline.
For greater convenience, some tricks are often used to smooth out the operation of such equipment, in particular, installing the pump on a concrete or brick base, on top of which a rubber mat is placed. In this case, the equipment is fixed to the base using anchors. This will somewhat smooth out the effect of vibration during operation of the device.
Additional information on how to install a pumping station at your dacha with your own hands is presented in the video.
A modern water supply system for a private or country house, including a pumping station, can satisfy all water supply needs. It allows you to provide several water intake points at once, including operating a water heater, washing machine, dishwasher, and heating system. Often specialists put the system into operation, but in reality there is nothing difficult about working independently. In this article we will tell you how to connect a pumping station and what you will need for this.
Where is it mounted?
Installing a pumping station with your own hands is possible either inside the house or in a caisson. An important condition for installation, regardless of the chosen location, is protection from flooding by underwater waters, as well as from winter cold. The connection diagram of the pumping station depends on the location.
The shorter the distance from the equipment to the water source, the less water pump power will be required.
The first option is in the basement of the house
The pumping station and other water supply equipment are installed in the basement of the house. In order to prevent the pump from flooding, a pedestal made of brickwork or concrete is erected in the room. When the basement is not heated, the installation site should be separated and insulated.

How to install a pumping station in a country house? Since people do not live in the country all the time, they often already observe the consequences of the spring flood. Therefore, the installation of a pumping station in a country house is most often carried out on a shelf attached to the wall at a fairly high level. Such installation will prevent damage to the equipment.

The main advice from experts on how to properly install a pumping station is a fixed installation without touching the walls. This prevents vibration of the walls from equipment operation.
The second option is in a caisson
Installation of the pumping station in a specially constructed caisson - a hermetic chamber made of metal. It comes in both square and cylindrical shapes. It has an insulated hatch that closes very tightly to prevent flooding. A household caisson is equipped with a height of 2 meters. The equipment must be installed below the ground freezing line - in this case, a constant temperature will be maintained at around 6-10°C from the soil.

The structure must be insulated around the perimeter and on top to prevent the equipment from freezing even in the most critical frosts.
Depending on their manufacture, caissons are divided into:
- factory - plastic container mounted at depth;
- self-assembly - from concrete rings, immersed 180-200 cm near the source.
The head of the well casing pipe must be brought to the bottom of the caisson.
Installing a pumping station in a private house is more convenient for maintenance, since you only need to go down to the basement. But surface equipment is quite loud, which is not always comfortable for the inhabitants. A caisson is certainly more preferable, since sounds do not penetrate the house. But there are nuances here too - in order to service the unit you will have to go outside to go down into the caisson. In winter, you will have to remove snow to do this.
Methods for connecting a pumping station
How to properly connect the pumping station? There are two ways:
- Single-pipe connection is possible at a depth not exceeding 10 meters.
- A two-pipe connection is used when the well depth varies from 10 to 20 meters.
Thus, even at the stage of preparatory work, the owner of the house decides how to connect the pumping station, taking into account the parameters of the existing well or well. The connection principle is the same for both methods. Since the first method is simpler, we will dwell on it in detail. For the second, you will need equipment with a remote ejector.
Sequencing
So, you have decided on all the nuances and know how to connect the pumping station. Before purchasing all the necessary materials, you will need a detailed connection diagram for the pumping station. This is especially true for pipes, which should be in reasonable supply. At the same stage, you will need a wiring diagram for the pumping station.
First stage
Do-it-yourself pumping station installation is carried out according to the following algorithm:
- It is necessary to assemble the ejector - this is a ready-made unit cast from cast iron. It has three outputs for installation. A mesh filter is installed at the lower outlet to prevent the suction of silt deposits from the bottom of the well. At the upper outlet there is a plastic socket on which a squeegee with a diameter of 32 mm is put on. Its length must first be calculated (will be described below). At the outlet of the flow, a special bronze coupling is installed, intended for attaching a polyethylene pipe.

- A check valve is installed behind the strainer to prevent air pumping.
- Installing a pumping station in a private house involves installing an additional check valve at the end of the pipe immersed in the well.
Having finished installing the ejector, you can begin laying pipes in pre-prepared trenches. Their depth should be half a meter lower than the ground freezes. The bottom of the trench should be covered with a layer of sand. This creates a “cushion” for the pipes.
To ensure tightness, before tightly tightening with an adjustable wrench, all threaded surfaces are covered with fum tape or tow made of flax. For this purpose, special sealing pastes can be used.
Second phase

When asking the question of how to install a pumping station in a private or country house, they mean connecting it to a well. We offer a detailed work algorithm:
- It is necessary to measure to what depth the pipes will be lowered. You can use a hose for this. Having lowered the “measuring device” to the very bottom, we make a mark at the level of the upper edge of the casing. Then we pull it out to measure. We must subtract one meter from the obtained value - this is the descent depth. If you lower the pipes lower, silt, grains of sand, etc. will be sucked in.
- We connect the P/E pipes to the assembled ejector. For this we use couplings. The total length of the structure must be equal to the calculated launching depth.
- To secure the P/E pipe to the casing, you can use either a purchased head or a pipe elbow. The head is not always on sale, so let’s consider the second option. Before lowering the P/E pipe into the well, it should be pushed through the elbow (90° angle) and “sealed” with special foam. Next, we attach the adapters one by one, and then the outer pipeline (angle 90°).
- Since water supply is used all year round, special attention should be paid to the thermal insulation of pipes. If they lie below the frost line, there is enough heat from the soil to keep them from freezing. When higher, high-quality processing is required.
Mineral wool (basalt) fiber is mainly used. It retains heat perfectly, does not become compressed over the years, does not rot in a humid environment and is not touched by mice. The electric cable used to wrap the pipes has also proven itself to be quite good, but if there is no electricity, the entire system will be at risk.
The installation of the structure is completed. Carefully lower it into the well. Be sure to secure the “head” to the casing structure. The installation of a pumping station at the dacha occurs in exactly the same way.
Final connection of the pumping station
How to connect a water pump? An external pipeline pipe is connected to the inlet of the device, and a home water supply pipe is connected to the outlet. After this you need to configure the equipment. To do this, open a special hole located on the front wall of the pump and fill it with water (about two liters). We carefully monitor the pressure readings of the operating device.
The pump should turn on at a pressure of 1.5-1.8 bar, and turn off at 2.5-3.0 bar. If the values differ, then the equipment should be adjusted using a relay.
VIDEO: How to properly pump and create pressure in the expansion tank
Connect to the water supply
Connecting the pumping station to the water supply is required when additional pressure is needed for the heating boiler to operate efficiently. For this design you will need a storage tank. First you need to disconnect the centralized water supply pipe. Its end is connected to the storage tank.

How to connect a water pump? We connect the tank to the inlet, and the home water supply to the outlet. This completes the connection of the pumping station to the water supply. The pump is configured as described above.
By following our instructions, you can install the pumping station yourself, and use the money saved to purchase better equipment. Good luck!
VIDEO: How to assemble and install a pumping station