
Do-it-yourself artificial bonsai: step by step with photos, master class, how to make, the most detailed guide, mini, video, growing at home from seeds. We make trees... from wire! Bonsai for sale! wire bonsai
The ancient Japanese came up with the idea of growing miniature trees, turning this process into an art. Bonsai is a tree in a pot or translated as “growing on a tray.” Artificial bonsai is still popular today.
Usually work on creating such a tree begins by looking for a good branch for the trunk. Sometimes the branch is a slow-growing plant that, for example, no longer develops. Due to improper growth conditions, the plant acquired an not entirely correct shape - thickening, unevenness, curvature. And these defects can, paradoxically as it sounds, be turned into art.
The base is a container that must be filled with clay, plaster, even plasticine. In a word, something that will hold the mini-tree.
Artificial bonsai: history (video)
How to make an artificial bonsai with your own hands: step-by-step instructions
Any master class begins with a list of materials and tools that will be needed for the work. If you take the standard manual, you get a kind of universal list of traditional bonsai.
Materials for making bonsai:
- Flowerpot or plate (ceramic);
- A fragment of driftwood or, alternatively, a three-core wire;
- Gypsum;
- Glue gun;
- PVA glue;
- Acrylic paints for finishing decor;
- Artificial greenery divided into inflorescences.
For beginners, the best option is a tree with a small amount of materials and fairly simple instructions.
The Art of Bonsai: The Ultimate Guide
So, why three-wire wire? It is not always possible to find the right snag or branch, and the wire is malleable to manipulation. At one end this wire needs to be stripped to get future branches.

Now you need to secure the barrel on a plate or in a flowerpot. You will need a heat gun and hot glue.
After fixing, the entire structure is coated with PVA glue. Then you can start diluting the gypsum.
Bonsai step by step:
- Dilute the gypsum according to the instructions, adding it to PVA, the solution should look like thick sour cream;
- The solution is applied to the tree frame, with its help form the structure of the trunk and branches;
- Leave the structure to dry for a day;
- After 24 hours, you need to coat the entire trunk back with PVA glue;
- When the glue dries well, it can be painted brown;
- Attention, the paint is also mixed with PVA glue (one part glue to three parts paint);
- The paint is applied not with a brush, but with a sponge;
- Many craftsmen prefer to paint the top of the trunk with ocher;
- It dries for two hours, and then you can make a crown;

It's just a matter of the stand. Use the following method to decorate the stand: mix the same PVA glue and semolina in a 2:1 ratio, and add green paint there. This mixture is usually placed on the bottom of the plate with a cocktail spoon, creating beautiful irregularities.

Bonsai: how to make it (video MK)
How to make a pine bonsai: decorating the area
Pine bonsai is a garden bonsai. That is, a tree that will delight you not in the house, but on the site. This bonsai cannot be called completely artificial; nevertheless, real pine seedlings are taken. But there are a lot of manipulations, since you yourself regulate the growth and development of the plant.

The main stages of growing pine bonsai:
- Several pine seedlings should be provided with good drainage and lighting, and should not be subjected to any special manipulations in the first year;
- In the second year, the seedlings are already pruned to 12 cm, while the remaining shoot should have good needles that cannot be pruned;
- Pruning is done at the end of March, at an angle of 45 degrees.
Pruned plants will thicken. If the needles are too lush, you can thin them out. Then a wire frame is placed on the seedling to give the plant the required shape. When the wire cuts into the trunk, it will be removed.
Pine bonsai: planting seeds (video)
DIY New Year's bonsai: artful decor for the long-awaited holiday
New Year's bonsai is the same artificial leaves or needles, which is more appropriate, only snow-covered. The question is how to make snow. Take into account how other crafts are made. There may be snow from broken polystyrene foam, snow from PVA glue and sea salt, beads, white sequins, etc.

But you can make a New Year’s tree in another way: for example, create a bonsai from a money tree with your own hands. Since the money tree is grown for financial well-being, this will be the best wish for the New Year. Well, the New Year's atmosphere will be created by festive decor - tinsel, pine cones, decorations.
How to make a bonsai from plastic bottles: a collection of ideas
And in this case, there are many variations on how to use plastic as decoration.
The two most common options:
- Leaves from plastic bottles. Leaves from a green bottle are cut out and melted over a flame, taking the desired shape. Many such leaves form the crown.
- Squares made from plastic bottles. Small squares or rectangles are cut, which subsequently need to be placed on the wire. These pieces are also heat treated. The wire is folded in half to form branches. It's not a quick job, but this way you can imitate a coniferous tree.

DIY bonsai in an aquarium
And you can place an artificial mini bonsai in the aquarium, which, by the way, looks healthy. The important step here is to choose the right driftwood. It has to be cooked.
Features of making bonsai in an aquarium:
- Take a whole bucket of water, throw in at least ten tablespoons of salt, put the water on the fire;
- Throw a snag into this water;
- You need to boil the driftwood for five hours, and then keep it in a bucket of cold water for another two days;
- Plant the dried driftwood “head down” in a clay flower pot;
- Place several large stones around the resulting trunk; pebbles and sand will also be needed;
- Java moss, disassembled into pieces, should be placed on the tree branches, and they should be carefully secured with a thin fishing line;
- You also need to put moss at the very base of such a tree.

The tree can be placed in the center of the aquarium. There are instructions that describe all the manipulations in more detail, but a lot is thought out by the master himself right in the process. For example, you can make a mountain out of sand and pebbles right in an aquarium, where a tree will grow, it looks exotic and very Japanese.
Bonsai in an aquarium (video)
Bonsai is an oriental decor that has long been loved in our latitudes. Such a tree will decorate a greenhouse, living room, office, loggia. If you love Japanese culture, then a mini bonsai will harmoniously complement your bookshelf with volumes of Japanese authors.
Artificial bonsai (photo)

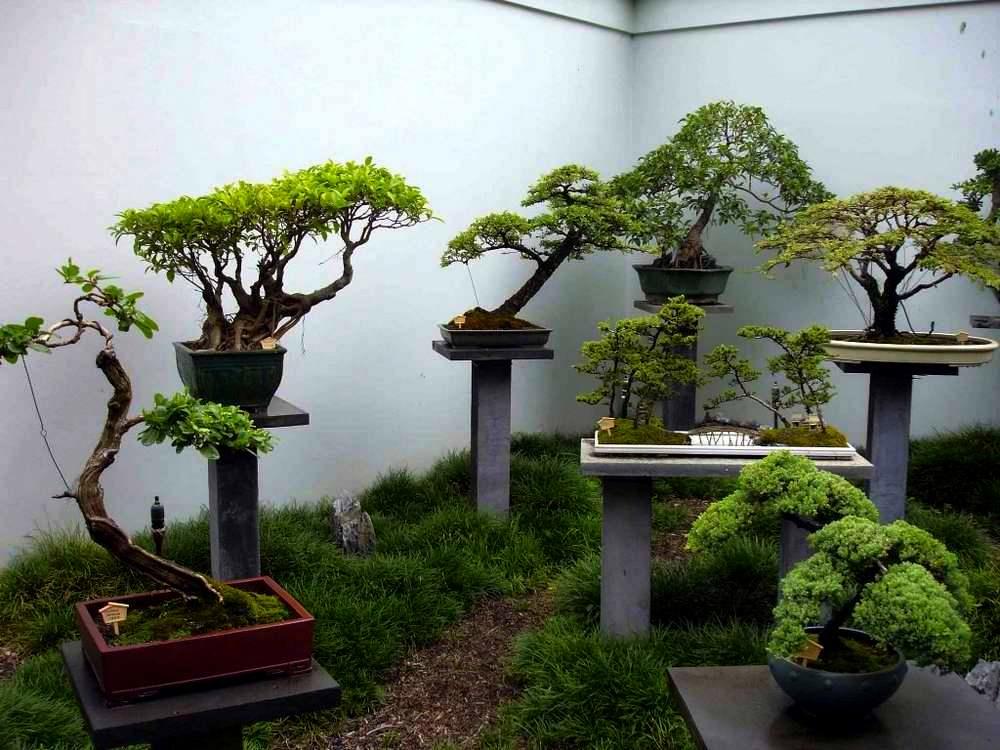


Bonsai- this is a very old tree, which is a sign of happiness and prosperity in every home. Undoubtedly, growing such a small tree at home is very difficult. Therefore, handicraftsmen came up with a completely new way to get rid of this problem and make your own bonsai. Using modern tricks, a little craftsmanship and just creativity, you can make your own bonsai. What is needed for this?
A little wire, no doubt. To create such a craft, different options are suitable. Some will use wire dyes to decorate their bonsai. Others will take wires of different metals. It depends on your preferences and interests. We suggest using the second option. Also, you may need tweezers and a side cutter to manipulate the wire, which will not give in at certain points. You will be able to study the most interesting solutions and various bansai later in the photographs below.
So, let's begin the manipulations. In order to do basic wire craft- We need a pot. You can buy it at any store, or use the services of unnecessary cups, glasses, and other containers. It is advisable to decorate your “Pot” with artificial moss, or use your own creative ideas to create an interesting option.

Then, you need to cut out the pieces of wire. It is very important that the length of the wire is 3-5 times longer than the original version. It is necessary to secure the wire inside the pot and create fancy shapes in bonsai style. This can be done using the famous pliers, or by deforming the elements of your wood with your own hands.
Then, second layer of wire laid along the root of your first layer of wire. In this way, you can make a fancy tree shape that will resemble a bonsai. You can decorate your bonsai in completely different ways. Use your own solutions or make your own ideas that will help decorate your bonsai.

remember, that appearance for bonsai- this is absolutely your fantasy. You decide how the elements of your tree will be decorated. Use modern and interesting deformations to create a more whimsical and interesting look for the flower.
Consider all the popular variants of this tree - Bonsai, which will be offered in this lesson. Some of them are made in miniature form, others are quite huge in size. In any case, it all depends on your desire and diligence. Such a Bonsai will be able to decorate the exterior of your home and give it completely new features. If you have a desire to make such an interior addition, it is quite simple. Such a craft will take 1-2 hours at most and yet it will look very interesting for any of your guests.
Thus, we can say that bonsai is an ideal element for decorating an apartment, as well as simply an interesting and varied craft.
Doing it yourself is a complex and lengthy procedure that requires experience and attention. The key to a successful project is the correct choice of plant. This is carried out taking into account climatic conditions and maintenance requirements. Experienced gardeners choose coniferous and deciduous varieties as a basis - pine and maple, which require minimal care. The main thing is to ensure the minimum required temperature regime.
Those who want to create a beautiful composition with their own hands can use the following green spaces as a basis:
- Sprouts of common lilac.
- Siberian larch.
- Pine.
- Siberian spruce.
- Juniper sprout.
- Kalina.
- A cob of azaleas.
- Bobovnik.
- Low almonds.
- Ussuri pear.
- Purple barberry.
- Varietal mock orange and others.
Garden ficus, low almond, and Jerusalem artichoke have also proven themselves well. You need to start by choosing a suitable container with humus. An ordinary flower pot will do. When choosing a soil, it is worth studying its formation. It is recommended that it provides drainage and retains the minimum required amount of moisture.
According to these criteria, sand, clay and humus are taken in equal parts. To plant a tree, you will need pruning shears to form the crown line, a spatula, sticks, a sieve, and a watering can. Spraying is carried out with a spray bottle. If there is a specialized store in the locality, then the seedling is bought there.
DIY pine bonsai
It is recommended to place the pine composition in an irregularly shaped container, the bottom of which is decorated with driftwood. If lightness of form is of paramount importance, then in this case a pot or tray of light shades and grass are used as a decorative element. After this, you need to carefully separate the smallest scales from the pine trunk. In order for the needles to look aesthetically pleasing, they need to be grouped into small bunches.

Further production of a green composition from pine proceeds step by step according to the following scheme:
- It is recommended to buy a slightly twisted seedling.
- Before planting, you need to check the taproot.
- For planting, it is advisable to use the same soil in which the seedling grew
- Supplement it with a substrate that allows moisture to pass through.
- A thematic video will help you choose a style.
- Pruning and crown formation begins in the spring.
- The formation of curved shapes is best done using strong threads that do not damage the structure of the wood.
- The density of the frame is weakened as the trunk thickens.
- All branches are cut at a pre-selected angle.
- Lightly trim the roots every 3-4 months.
The shape of the crown is adjusted with sharp scissors, allowing you to quickly get rid of excess. The placement of the craft is carried out with orientation towards the sun. As the coniferous tree develops, it requires a large amount of natural light.
How to make a money tree bonsai
There are many ways in which you can make a bonsai from the Crassula, also called the “money tree”. The key to success lies in controlling the growth and shaping the crown of the money tree. Further growth can be stopped by pinching, carried out as the plant reaches the required size.

If you plan to go the whole way on your own, you can buy seeds at the store. In this case, strictly 1 seed is planted in 1 pot. Step by step it then needs to be watered, but not too much.
The seed takes root well, so no additional care is needed, however, you need to follow some recommendations:
- The depth of the pot exceeds by 1/3 the maximum length of the root system.
- You can grow it in an aquarium, but then the shape will be curved.
- The splendor of the composition is formed by creating at least 2 sprouts from 1 bud.
- Excess buds are removed with tweezers.
- Pruning is carried out according to a pre-planned plan.
- You can decorate the composition with decorative elements made from foamiran.
- If the main holiday of the year is approaching, then white foamiran will form the New Year’s mood.
How to make a bonsai with your own hands (video)
I decorate offices and living spaces with miniature bonsai compositions. With proper care and timely pruning, a bonsai is formed in 2-3 years. After this, the gardener must carefully monitor the composition, maintaining the splendor of the crown and the shape of the branches. For these purposes, wire or thread is used. Pruning is carried out no more than once every 4-5 months. The specific period depends on the type of tree.
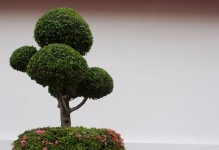
Original options for beautiful bonsai (photo)


It is believed that the art of bonsai originated in China 200 years BC. However, the creators of the first bonsai were not gardeners, but rather stone cutters, because tree trunks were made from corals, and branches from agate and jasper.
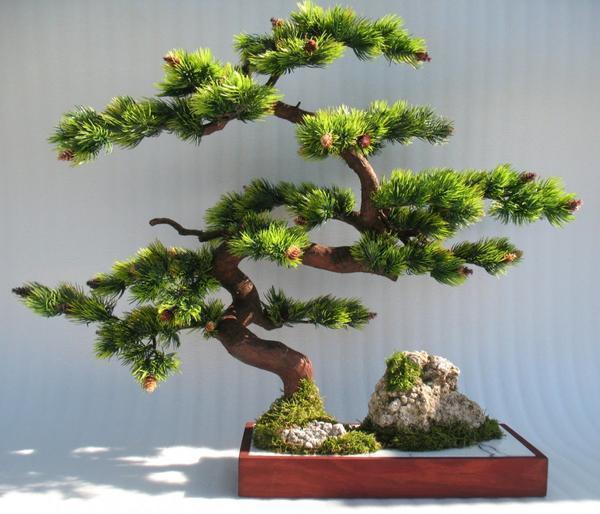
Of course, both growing trees and making them from stones require extraordinary skill. But, you can simplify the technology for creating bonsai and prepare trees... from wire (see figure).
The best material for bonsai is copper or brass wire with a diameter of 0.3-8 mm, either without insulation at all or varnished. It is better to take green fishing line for pine needles.
The tools you will need are side cutters, pliers and tweezers. The wire is cut into lengths of 2- 3 times the expected height of the tree. Wire blanks are collected into a bundle. If a large tree is being made, then the assembled bundle is tied with thick wire. Then they twist the middle of the bunch and only then take on the roots and branches.
The smaller part of the twisted bundle of wire is intended to make roots, which are necessary to secure the product in the vessel.
Now that the tree with roots and branches is ready, they begin to make needles. The role is performed by a fishing line, which is tied with a regular knot and cut to the required size. Two needles extend from one node. Each subsequent pair must be rotated to some angle relative to the previous bunk and the bundle must be pressed tightly against the bundle with tweezers. A branch of a coniferous tree comes out. Usually they make 12-25 needles on one branch. The remaining end of the wire is cut at a distance of 4-5 mm from the last needle and bent with pliers.
After all the needles have been tied, you can fix the manufactured artificial tree in a container and, using tweezers, finally give it the required shape.
At this point, the work of creating a tree can be considered completed.
Advantages of this tree:
- Does not require maintenance;
- Free configuration of branches - the branch can be bent the way you want;
- Does not depend on the environment;
Of course, most likely, your first trees will not be for sale, but with each tree you will improve your skills, use new materials, technologies, etc.
The demand for this product is quite stable, mainly as a decorative element (in the wake of Feng Shui), and since the price of this tree is minimal, you will quickly find your customer.
Bonsai is a real living sculpture, the shape of which is given not only by trimming the branches, but also by applying wire (the latter is necessary to obtain a bonsai of a certain style).
Wiring is the most important component of modern bonsai design. The most common mistakes made when performing this technique are crossing the wire, missing branches, or applying it too tightly or too loosely. It is very important to learn how to apply wire to wood correctly.
The essence of the ligature is that the trunk and branches of a tree are wrapped with soft copper or brass wire to give them the required shape. In addition, applying wire helps slow growth by limiting sap flow in plants. The trunk and/or branches of the tree are wrapped with copper wire from bottom to top in a spiral in the direction of growth. The wire should not be applied too tightly - this can lead to a complete cessation of the movement of sap, and the tree will completely stop receiving nutrition. It is also necessary to ensure that leaves or needles are not caught between the tree and the turns of wire.
Having wrapped the branch with wire, it is carefully bent, giving the desired direction. To increase the bend, you can place a piece of wood as a spacer between the trunk and the branch, or stretch twine between the container and the branch, being careful not to break it by pulling the twine too tightly. In this case, the twine should be well tensioned. You can bend a trunk or thick branches using clamps, but in this case you should act very carefully. The tree bark must be covered with moss or a piece of cloth. After this, the clamp is placed at the desired bend and carefully secured, gradually screwing down.
The wood should not be allowed to crack, although the clamp must be held tight to achieve the desired result. This operation is carried out in the same time frame as the usual wire application. It is also important to prevent the copper wire from growing into the bark. If this happens, the ligature is removed with pliers, being careful not to injure the tree. Damaged areas of the bark are covered with a special mastic (garden pitch). For different tree species, the ligature is used at different times of the year:
* Wire is applied to coniferous trees in winter for 8-10 months.
* Wire is applied to deciduous trees in the spring and left for 4-6 months.
* Wire is applied to fruit trees in June - July and left for a period of 3 to 4 months. Wire is applied to indoor bonsai after their young shoots become lignified. After about a month it is removed, since their bark is very thin. If the desired shape could not be obtained the first time, the operation is repeated after 2 months.
The application of wire to the trunk and branches is carried out annually until the tree takes the desired shape.

The main mistake is applying the wire too loosely. On young or thin shoots, you can use thicker and stiffer wire. A kind of cage is woven from it, inside which the branch can grow without constraint.

When the wire is wound too tightly, it can damage the bark while shaping the branch into the desired shape. In addition, wire applied in this way is much less effective. However, it is equally useless to leave too much distance between the turns.

Wire wound too tightly will damage the wood as the tree develops. It is very important not to wrap the wire around the tips of the branches and the top of the tree, as these areas grow much faster than other parts of the plant.

Ideally, the turns of wire in the branching areas should be directed in opposite directions. This will maintain the slope, support the branch and fix it in the desired position.

Do not place wire on trees with thick bark, such as pine trees, as this may damage the bark. If the wire is applied not only to the branches, but also to the trunk, use as little wire as possible and protect the bark with special tape or raffia (palm fiber).

This picture shows scars on the bark of a pine tree due to wire being left on the branch for too long. Although such scars can be healed with the help of the drug “Cut Paste”, which stimulates the formation of bark, the marks will still remain. If the scars remain inside the crown, this is not so bad, since the foliage camouflages them. But the scars make the branches more vulnerable to bad weather and strong winds.

Although thin-barked trees such as maples will heal wire scars over time, brown scars will still be noticeable, especially if the tree has colored bark.

The length of a branch can be reduced in three ways. First, you can cut the branch to the shortest length and then shape it into a different shape. Secondly, you can apply wire and direct the branch upward, and in the part where the leaves grow, downward (but this technique must be carried out on other branches too, so that the shape of the tree remains balanced). Thirdly, you can lay the wire and create a series of bends, bringing the length to the desired length.

The wire sometimes grows into the tree, and removing it weakens the branch. Remove as much wire as possible and treat the scars with Cut Paste. Then cover the damaged area with raffia and secure the ends of the raffia with latex material or "Kiyonal".

Before you can point a branch up or down, you need to understand how the wire will support it. If you are pointing a branch downwards, the wire should be placed on the trunk below the branch. If you direct the branch upward, then the wire is placed a little higher on the trunk.

In the past, wire was also applied to the trunk, but today it is customary to apply it only to those branches that are intended to be formed. This reduces the level of stress experienced by the tree and reduces damage to the bark. Quick summary: Only apply wire where it is really needed.

When removing wire, use wire cutters with short blades. Never unwind the wire; you risk damaging the bark or young buds.

Always wrap branches with wire all the way to the tips. When placing wire on conifers, particularly pine trees, lift the tips of the branches to give the tree a beautiful shape.

Over the years I have used stranded wire to shape trees. This technique was initially used only on young material. It is easy to master even for beginners. Using wire of the correct thickness, you can significantly reduce the time spent on this technique. Stranded wire is best used on young trees (mature plants are formed using single strand wire). If you are going to leave the wire on the tree for any period of time, do not twist the strands, as it will be difficult to remove one of them later if the need arises.

Example of stranded wire.

Layering single strand wire allows for the formation of more mature trees
Using a so-called turnstile allows you to change the direction of the branches, for example, to pull a thinner branch located at the top to a thicker one at the bottom. It is very important to protect the places where the wire is placed by placing small rubber pads under it.