
We make a mansard roof with our own hands. Mansard roof truss system: diagram, design and installation features How to attach a rack to a mansard roof beam
When installing rafters for the attic, all technological requirements must be met so that the supporting structure can fully perform the tasks assigned to it. Trusses and other associated elements must be installed so that the finished structure can withstand wind and snow loads for a particular region. All these points are further clarified during the calculation process. If desired, you can install the rafters for the attic yourself, saving money on the services of third-party workers.
Rafter fastening diagram.
Basic information about roof rafters
An attic is a room under the roof; it is located on the attic floor of a building. This technique allows you to competently plan the growth of used areas without significant material costs. You can live in the attic no worse than in any other room. But to do this, it needs to be properly equipped and, in particular, the rafters for the roof must be correctly installed.
Mansard roof rafter system.
Before installing rafters for the attic, you need to choose the appropriate type of structure. Rafters can be layered or hanging.
Layered rafters for attic roofs are best installed in buildings that have a load-bearing intermediate wall. To install a layered rafter system for an attic roof, it is necessary that 2 load-bearing walls are located at a distance of no more than 7 m from each other.
If there are no internal walls, the only option is hanging rafters for the attic roof. The standard design includes rafters and a lower chord - a tie. The Mauerlat is used as a supporting element. Wire and staples are used to secure the rafters. Installation is carried out taking into account the expected load level.
Features of installation of the rafter system

Installation of roof truss system.
Before you begin installing rafters for the attic roof, prepare everything you will need during the work process:
- Unedged board.
- Wooden beams.
- Thermal insulation material.
- Nails.
- Annealed wire with a diameter of 3-4 mm.
- Leg-split.
- The boards are 15 cm wide and 4-5 cm thick.
- Moisture-proofing material.
There are several different types of attic roofing systems, namely:
- Triangular.
- Asymmetrical.
- Symmetrical.
- Broken.
One of the most important design aspects is the calculation of the roof slope angles. When performing this stage, the following features must be taken into account:
- Climatic conditions of the region.
- Type and characteristics of materials used for construction and finishing.
- Personal preferences of the home owner.

Mounting points for the rafter system.
The greater the angle of inclination of the roof slope, the less free space there will be in the attic room. However, if the angle is too small, the roofing system will be more difficult to clean from sediment and dirt. Over time, this will lead to a decrease in system reliability. Therefore, it is very important to choose the optimal roofing material for the existing conditions.
Correct installation of rafters for the attic roof ensures the strength and stability of the roof. When performing this work, you must follow a number of rules. Firstly, the structure is constructed from wooden beams with a section of 100x100 mm or 150x150 mm. Secondly, the system is carefully waterproofed. Typically, roofing felt or roofing felt is used as waterproofing.
The frame structure is laid on reinforced concrete bases. To fasten the supporting unit, wire and metal brackets are used. Quite often a tongue-and-groove connection is used. It is important that the wood used to construct the rafters has a moisture content of no more than 15%. If possible, the choice should be given to coniferous species.
A disinfectant atmosphere must be created. It is strictly forbidden to use damp timber. Because of them, the entire rafter system can simply collapse. Therefore, the bars must be dried before use. Additionally, the wood is impregnated with antiseptic and fire-retardant compounds.
When marking the installation of supports, calculate the installation step so that all rafters are installed vertically in the same plane. A tool familiar to any builder called a plumb line will help you check the verticality of the installation.
To ensure that the parts are held in place as securely as possible, use braces or braces. Upholster vertical posts with suitable materials. Most often, double-sided cladding is performed using plywood and plasterboard. Insulation must be laid between the sheathing sheets.
Step-by-step instructions for installing rafters

Scheme of strengthening the rafters with additional struts.
The process of installing a rafter system for an attic roof begins with laying the top beam. To secure it, you can use nails, screws and metal staples. Bars with a cross section of 150x150 or 100x100 mm are used.
After this, the Mauerlat is installed. It is needed, first of all, to prevent the roof from tipping over in a strong gust of wind. The Mauerlat must be designed and installed in such a way as to withstand the loads that apply to both the roof of the house and its walls. The mauerlat itself is laid out from beams. It is best to use 100x150 mm bars. You can also use boards with a thickness of 50 mm or more.
The selected material should be laid horizontally, having previously calculated the size of the wall surface. A waterproofing material must be installed under each block or board, which will protect the elements of the Mauerlat from the harmful effects of moisture.
Finally, the rafter legs are installed. These structural elements can be purchased ready-made or made independently. First, the pitch of the rafter legs is calculated, after which markings are applied to the mauerlat. To do this, you need to put marks on the rafter frame and the mauerlat. Professionals recommend installing rafters in increments of 1-1.2 m. Lay the outer rafters towards the front. It is important that the edge line of the gable and the top of the legs are at the same level.
Rafters are made of bars or boards. It is important that the boards are straight.
It is better to refrain from using material with knots; the maximum permissible number of knots is 3 pieces per linear meter.

Types of rafter structures.
Next, you need to take the twine and stretch it between the outer rafters. In this case, it will serve as a level for mounting the remaining legs. Finally, you will need to connect the upper parts of the rafters together in pairs and install the ridge beam. It will be needed if the roof is more than 7 m in length, and the rafter frame weighs relatively much.
If the roof is smaller, it will be enough to tie the top of the legs with guy wires. You can use the braces directly as attic ceiling beams in the future. In strong winds and snow, these elements will take on a certain part of the load.
Finally, the sheathing is installed, moisture insulation and thermal insulation material are laid, the roof is installed, and the walls and ceiling of the attic are finished.
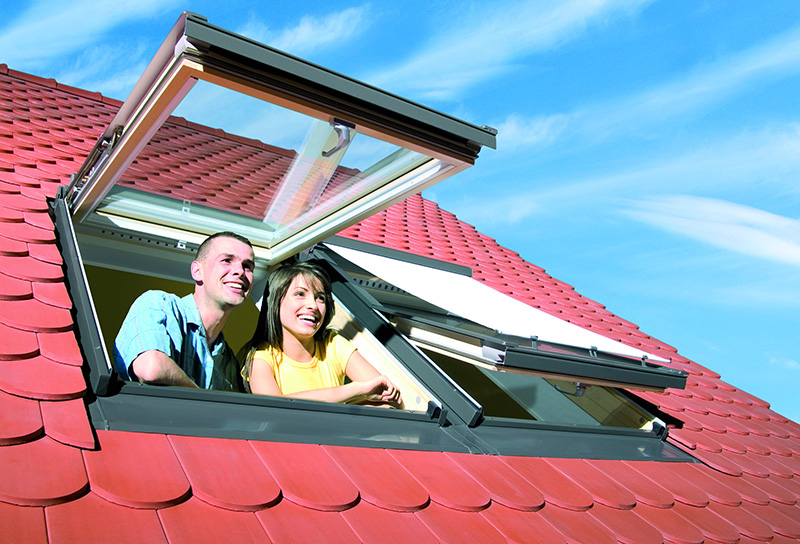
If there are windows in the attic roof, the work is performed in the same sequence, but at the stage of installing the rafters, window openings are laid into which window frames will later be installed. Do not forget that the attic must have a size of at least 3x2.2 m. Otherwise, living in such a room will be extremely uncomfortable.
A mansard roof, made in accordance with all the rules, will be a wonderful decoration for any home and will serve for decades. Pay due attention to the design of the rafter system and approach this task with all responsibility. You will not only save money, but will also control every stage of the work, which will allow you to be completely confident in the quality of its completion. Good luck!
Warning: Use of undefined constant WPLANG - assumed "WPLANG" (this will throw an Error in a future version of PHP) in /var/www/krysha-expert..php on line 2580
Warning: count(): Parameter must be an array or an object that implements Countable in /var/www/krysha-expert..php on line 1802
The attic is an excellent opportunity to increase the total and usable area of the house. It is installed in the attic and is quite suitable for living, provided that it is designed correctly. The rafter system of the attic roof, drawings of which can be found in this material, is the basis of the entire structure. And it is precisely this that needs to be given the closest attention when designing.

Mansard roof rafter system - drawings
An attic is a room located directly under the roof. Its facade is partially or completely formed by the roof surfaces (according to SNiP 2.08.01-89).
SNiP 2.08.01-89. Residential buildings. Downloadable file (click the link to open the PDF in a new window).
It is a full-fledged residential floor; there can be one or several rooms, depending on the design parameters.
On a note! The word "attic" comes from France. It was the French architect who, in 1630, came up with the idea of usefully arranging attic spaces. And this man’s name was Francois Mansart - hence the name of this type of superstructure.
The peculiarity of attic roofs is not only the special design of the rafter system, but also the need for detailed consideration of other aspects - insulation, moisture and vapor barriers, etc. Since due to the attic, the load on the foundation and walls of the building itself usually increases, then predominantly all of it elements are built from lightweight materials. That is, it is recommended to use wood to create a rafter system; lightweight materials are used as insulation.

The attic can be of impressive size and occupy the entire area of the building, but within its walls. Sometimes it is installed only on part of the floors, and then the rear ones are covered by a regular roof.

Very often, the attic is used in individual construction, because it is an opportunity to increase the living space of the house and make it warmer (heat loss through the roof is reduced by an average of 7-9%). And the costs of arranging an attic will be much less than building a full floor.
In general, building an attic is not very difficult and you can cope with the task yourself. The main thing is to correctly calculate wind, snow and other types of load.

Prices for timber
Types of attics
The design of the attic will directly depend on what shape the roof is supposed to be installed. After all, part of the walls of this room will be formed by the roof slopes. Depending on this, there are several types of mansard roofs.
Perhaps the simplest option for arranging the roof itself and the attic floor. This roof has only one slope, which rests on the multi-level walls of the building. Thus, the slope angle is formed. By the way, it should not go beyond the strictly limited limits - 35-45 degrees (if the slope is less, then snow will constantly accumulate on the roof in winter, which will significantly increase the load on the entire house and will cause the installation of additional supports in the already small in size attic). The rafter system here is extremely simple.

On a note! The rafter structure will not require additional supports if the distance between two walls located opposite each other does not exceed 4.5 m.
Such attic roofs look original, despite the simplicity of their design. Usually, a fairly large window is made on the side of the high wall of the attic, which allows you to get a well-lit room.

Mansard roof with two slopes
This option is also relatively simple to implement and is therefore widely used. The main thing is that the height of the roof itself allows you to arrange a living space underneath it. The rafter system of this roof looks like a regular gable roof; it can be asymmetrical or symmetrical depending on the location of the ridge.

The gables are usually simple and straight, and the room inside will have the shape of a trapezoid or square (the latter option is only possible if the attic space is spacious enough). The height of the ceilings near the walls should not be more than 1.5 m; above that there is a sloping cone-shaped ceiling.
The main disadvantage of a gable roof in terms of arranging an attic is the loss of most of the free space. That is, the lion's share of the room is cut off by the roof slopes. Of course, this free space is usually used as a storage space, but this aspect has a very significant effect on the size of the attic.

Broken mansard roofs
In fact, this is also a kind of gable roof, but its slopes have two parts, located at different angles relative to the ceilings. Due to this, you can get a fairly spacious attic floor, which will be equal in area to almost a full second floor (it will be only 15% smaller than the lower floor). The height from ceiling to floor will be the same throughout the attic and will be about 2.2-2.3 m.

Broken mansard roof - drawing
However, this design involves the construction of a rather complex rafter system. And not every novice master will be able to cope with this task. However, despite this, the sloping roof option is quite common.

Hip roofs, mansard roofs
Such a roof involves the creation of the most complex type of rafter system, requiring the most accurate and painstaking calculations. The surface of the roof itself will have a fairly large area, which is why you will have to spend a lot of money on other materials - insulation, hydro- and vapor barrier films, etc. But in general, the attic turns out to be quite spacious, although parts of the usable area are cut off .

But such a roof has maximum resistance to snow and wind loads. The overhangs can be quite large and will be ready to protect the walls of the building from the effects of precipitation. Such attic roofs look very attractive.
Attention! When arranging a hipped roof, it is important to take care of the need to strengthen the layered rafters - they are the ones who experience the maximum load.


Attic roof rafter system
When installing an attic roof, the rafter system can be made from elements of a layered or hanging type. In the first option, the rafters are installed so that they form a triangle with even edges. In this case, the support is carried out on the mauerlat fixed along the perimeter of the walls, on additional supports installed under the rafters, and the connection of two boards in the ridge area also serves as a support point.
When installing hanging type rafters, supports in the form of additional beams are not provided. They rest only on the walls of the house. Pulls may be used. In this case, the rafters themselves work in bending and compression.

Hanging and layered rafters - example drawing
Creating a rafter system when building an attic is a primary task. It is first important to correctly calculate it and take into account all the subtleties of its construction. To understand what will be discussed, you need to familiarize yourself with its main elements.
Table. Main details of the rafter system.
| Element | Description |
|---|---|
| Mauerlat | This is a beam (or board) that is fixed on the upper end part of the load-bearing wall of the building. The rafter legs will be attached to it. It plays the role of a support and will transfer the entire load from the roof to the walls of the building. |
| Rack | Any vertically located beam that acts as a support for the rafter legs. |
| Floors | This is a series of beams laid horizontally to form the floor of the attic floor. They also play the role of the ceiling of the first floor of the building. |
| Rigel | These beams are located horizontally and are additional reinforcing and supporting elements for the rafters. May also be called "puffs". |
| Rafters | Also called “rafter legs”. They form the frame of the roof and give it its shape. Moisture-proof materials, sheathing and roofing will be attached to them on top. |
| Lathing | Many blocks or sheets of plywood that are attached to the rafters. It is on them that the roofing material will be directly fixed. |
| Suspension | A board that helps distribute the load. Installed under the bolt or tightening. |
| filly | The board that forms the roof overhang is fixed at the bottom of the rafter leg. |

Prices for construction boards
Construction boards
Required calculations
In order to avoid mistakes when designing an attic, it is important to carry out a number of preliminary calculations. Depending on the chosen type of rafter system and type of roof, they may differ. The easiest way is to use a special program, but you can try to do all the calculations manually.
It is important to determine the area of the final roof, the dimensions of the attic, and the width of the floors. The calculation is made based on the following data:
- length and width of the house;
- volumes of precipitation in winter and summer (this will help determine the required roof slope angle);
- the width of the joints between parts of the floors.

An example of calculating the pitch of rafters in the program "Rafters 1.1"
Let's consider an example calculation: the length of the house is 12 m, the width is 3 m. The amount of precipitation in the area indicates that the required roof slope angle should be about 40 degrees. The calculation is made using the formula Hk = L x tgA, where Hk is the required height, L is ½ the width of the building, tgA is the tangent of the angle. Total: Nl = 3/2 x tg40 = 1.26. This means that the recommended roof height should be 1.26 m.
On a note! Most often, when installing mansard roofs, owners opt for broken rafter systems. The methodology for calculating parameters in this case can be found in SNiP 2.08.01-89 and TKP 45-5.05-146-2009.
When people start building a house, they rarely think about the fact that the composition of the family may soon change. What to do if you need additional living space, but expanding your home with extensions is impossible due to the small area of the land? The design of the mansard roof solves the problem of lack of space; it can be installed on a house that is just being rebuilt or can be used to reconstruct an existing roof.

Gable attic

Broken roof with attic
Types of mansard roofs
The group of attic roofs includes all types of roofing, under the slopes of which you can arrange a living space. According to building codes, an attic is distinguished from an attic by a ceiling height suitable for human habitation and the presence of natural light. The following are suitable for attic installation:


Houses with any type of roof can be equipped with an attic, however, working with a hipped, pitched and asymmetrical roof is more difficult and expensive; it is better to abandon these options in favor of more rational ones - a gable or broken roof.
Types of attic spaces
A heated attic space is a real alternative to the second residential floor of a wooden or brick house. The fact is that increasing the number of floors of a building is associated with significant costs for the capital foundation and the construction of stairs. Different attic configurations are used depending on the available space and the needs of the homeowner:

- Single-level. Under the broken or straight slopes of the gable roof there is only one living space. The construction of an attic of this type does not involve an increase in the weight of the roof, so it is suitable for buildings under construction and reconstruction. Even a master without experience can perform calculations and build a drawing of a one-level attic. According to building codes, the ceiling height in a residential area must be 2.5 m or more.
- Single-level with remote console. A cantilever-type mansard roof device is placed under an asymmetrical roof. To increase the area of the living space, part of it is moved outside the perimeter of the structure. The protruding part of the attic, supported by pillars, is adapted for a shed or garage. The roof of the house with consoles is asymmetrical; the main part of the house is covered by a gable roof, and the console is covered by a single-pitched “patch”. A cantilevered attic is built to install vertical windows for natural light. However, professional architects can create a project and drawings of such complexity, and the complex diagram of the rafter system is not suitable for self-installation.
- Two-level. If the roof height exceeds 5 m, then in the attic room you can arrange two rooms located at different levels and connected by a staircase. This type of attic cannot be added to existing houses. Two-level premises are planned at the design stage and taken into account when creating foundation drawings. The relative arrangement of the rafter system is specially developed for the complex, asymmetrical geometry of the roof slopes. The second level of the attic rests on columns, so the reliability of the structure directly depends on the correctness of the calculations and the professionalism of the architect.

Designers can create real masterpieces from cantilever and two-level attics, using the advantages of panoramic lighting, equip a greenhouse, a nursery or a bedroom filled with fresh air and light, however, a simple single-level design is more suitable for self-installation.
Advantages of the attic
Homeowners try to use every opportunity to rationalize construction costs, so they do not miss the opportunity to use the space under the roof of the house. This option for increasing the usable area of the house has the following advantages:

- Minimum price 1 sq. m of living space. Due to the fact that the equipment of the attic is not associated with an increase in the cost of constructing the foundation, the cost of each meter in the house is cheaper than when constructing two-story structures.
- Rationalization of heating costs. An air pocket between the floor and ceiling of the attic prevents heat generated by heating devices from escaping through the roof. Air does not transfer heat well, so the ground floor of the building will be warmer, which leads to energy savings.
- The finished look. The equipment of the attic makes the appearance of the house complete and harmonious, allowing you to equip a balcony, canopy or garage.
- Speed of construction. During the construction of an attic in a residential building, it is imperative to stop using the first floor. The speed of installation allows us to complete the work on equipping the attic within a week.
- Minimum costs. Experienced builders say that there is no way to get a few square meters cheaper.
To equip an attic room, the length of the end wall of the building must exceed 4.5 m, and the area of the house must be more than 7 square meters. m, the recommended proportion of height to area is ½.
Natural lighting in the attic
The presence of natural light is a prerequisite that must be met in order for an attic space to be considered residential according to building codes. There are two ways to organize it.

When choosing windows for the attic, keep in mind that it should be in harmony with the roofing material, the total area of the windows cannot exceed a third of the surface of the slopes, and the size of the translucent structure directly depends on the angle of inclination.
Ventilation equipment
If you are going to insulate and heat the attic, it must be equipped with a forced ventilation system. The cold under-roof space is ventilated independently using dormer windows. In a well-insulated attic, natural air circulation is hampered, making it stuffy, damp and uncomfortable. To avoid such problems, installation is necessary:


Arrangement of elements of a forced ventilation system on a soft roof
A working forced ventilation system forces air to circulate using convection - the property of warm air rising to the top, making room for cool air taken from the street. This will increase the service life of the rafter system and roofing material, protect against mold and dampness, and also create a pleasant microclimate in the attic.

There are ready-made drawings of mansard roofs of standard sizes available for do-it-yourself installation; if you are an inexperienced builder, then it will be safest to focus on these options.
Video instruction
An attic in a private house is an ideal solution for expanding living or utility space without adding an upper floor. Arranging an attic in the attic space is an original and new exterior of the house, saving energy by reducing heat losses in the roof, and increasing living space. But the large size of the house is not a reason to start work on arranging the attic: you need to have a foundation with a sufficient margin of safety for the weight load, since the finished attic space will have to be thoroughly remodeled.
Features of the attic
The main thing that distinguishes an attic from ordinary rooms is that it has almost no walls in the usual sense, since the walls are a modified rafter system constructed from many inclined roofing surfaces. Therefore, the design of the window will be very different - it should not interfere with natural light, and must take on loads in the form of precipitation and strong wind - the impact of weather conditions on a sloping roof is stronger than on the massive elements of the building.
Important! SNiP regulations stipulate that the area of the window opening should not be less than 10% of the floor surface in the common room. Therefore, when dividing an attic space with partitions, it is advisable to also make a window in each newly formed room.

It is easier, cheaper and faster to install inclined windows in the attic roof than to make a special vertical projection under it, violating the design calculations. In any case, the window opening must be waterproofed or a window with reinforced glass and a reinforced metal-plastic profile must be ordered.
Advantages of installing a tilted roof window:
- A large flow of natural light, smoothing out chiaroscuro;
- There is no need to radically alter the shape of the roof or change its relief;
- Simple installation, feasible for the owner himself.
The degree of illumination depends on the area of the opening, which is proportional to the angle of inclination of the roof. Therefore, the conclusion is obvious: the steeper the sloping attic roof, the wider and higher the window opening should be. The thickness of the metal-plastic profile should almost fit into the distance between the rafters, so that there is something to attach the window to without destroying the rafter system. If you order a wider window, you will have to make a reinforced lintel that fastens the rafters cut at the place where the window is inserted. If you need to install a wide window, you should first think about the option of installing two small adjacent windows so that the roof remains solid. 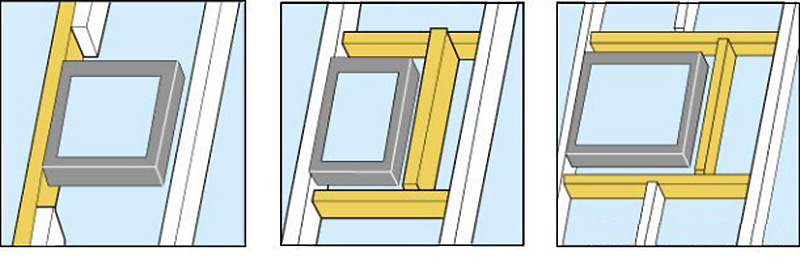
When installing a dormer window (a vertical dormer window that requires the frame to be moved outside the attic), the geometric shapes of the roof must be complicated by installing the top and side valleys, and the laying or installation of the roofing also becomes more complicated. It is much more difficult to remake a finished rafter system than to install a new attic window into your individual one. Valleys must be carefully waterproofed, since their location and geometry relative to constant atmospheric influences make these places most vulnerable to the penetration of moisture and cold. In regions with high average annual precipitation, it is recommended to install snow guards over dormers. But the main advantage of the dormer - you can stand next to it at full height - outweighs all the disadvantages that can be eliminated.
A window recessed into the roof is made if access to the balcony is provided through this window. In other cases, this is an unattractive option: poor natural lighting, unjustified complication of the roof geometry, high labor costs with minimal effect. 
The most affordable option is a window at the end of the attic - a cheap and practical solution that can be fully implemented without outside help.
Attic rafter system
In individual construction, a house with an attic is often built with a sloping roof, although this is an expensive solution. Sloping attic roofs, due to their design features, greatly increase the usable area of the interior of the attic. With the same width of the foundation of the house and the floor, the rooms in such an attic will have a larger area due to the projections and niches than the rooms under the roof of a conventional structure. 
The standard design of a sloping roof allows you to lower the eaves overhangs much lower, not only making the exterior of the house very original - such overhangs protect the walls and foundation of the house from wind and moisture, directing precipitation away from the home.
The more complex a do-it-yourself sloping roof, the stronger the dependence of the reliability of the structure on the materials from which the roof is made, on climatic conditions, on the thickness of the beams of the rafter system and other factors. The classic do-it-yourself mansard roof, drawings of which are given below, has a slope ratio of the lower slopes to the floor of 60°, and the upper slopes of 30°. 
SNiP stipulates a comfortable ceiling height in attic rooms - at least 2 m. Therefore, a scheme with a roof slope of 600 is completely justified, and the reliability of the structure is ensured by thicker floor beams and rafter beams than with a conventional gable roof.
In the classic construction of an attic, the force of the wind and the load from the weight of snow on the sides of the roof with a large slope are not taken into account. Snow will accumulate on the upper surface of the roof, made with a slope of 300-450. The greater the angle of inclination of the roof, the stronger the windage of the roof, so in climates with strong winds it is necessary to build roofs with a small slope, and this poses a problem for arranging an attic - the area of the house in such conditions should be quite large.
Sloping roof schemes
The frame of a sloping roof is constructed from first or second grade pine lumber. To carry out calculations, parameters such as the cross-section of timber and sheathing boards, the dimensions and weight of roofs made of various building materials, snow and wind loads, and the spacing of rafters are regulated. 
A roof design with a hanging rafter system is justified if the base of the triangle (top in the figure) has a size of ≤ 4.5 m - this determines the width of the attic. If the width is greater, then layered rafters are installed, which are mounted on the wall.
How to calculate a broken type roof
The pitch between the rafters is often determined by the width of the insulation - this solution allows you to save on rolled materials, and the distance between the rafters is chosen 2-3 cm less than the width of the insulation material. For example, with a mineral wool slab width of 60 cm, the distance between adjacent posts should be 57-58 cm. 
The rafter boards are also calculated in width based on the insulation parameters. To ventilate the layers of thermal insulation, it is necessary to provide a ventilation clearance of 20-30 mm, otherwise the accumulating condensate will cause rotting of the wood, and then damage to the insulation. For conditions in the middle zone, the thickness of the insulation can be no more than 230-250 mm, therefore the minimum width of the rafter legs is 230 mm with a board thickness ≥ 50 mm. The greater the wind, temperature and snow loads in the region, the thicker the rafters should be made. 
We recommend: To save lumber, insulation can be laid in two directions: along and across the rafters, making a thin and sparse sheathing between the layers. With a minimum thickness of basalt wool slab of 100 mm, you can use a 50 x 150 mm board, leaving a 50 mm ventilation gap.
Installation of attic roof
The mauerlat on the attic roof is equipped with standard techniques - fastening the timber to the wall with tying wire, anchors or studs. If the house is made of timber or logs, then the upper crown of the log house, impregnated with an antiseptic and substances that increase the moisture resistance of the wood, can serve as a mauerlat. 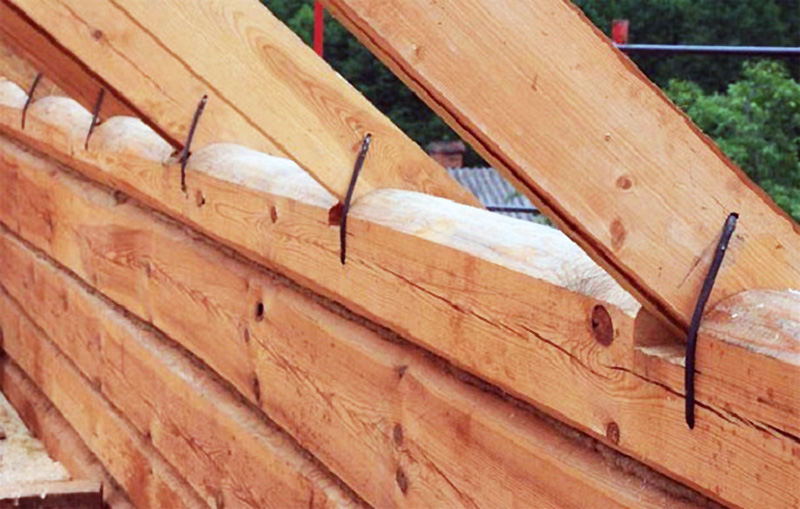
For the Mauerlat in a house made of cellular concrete, a monolithic reinforced grillage is poured on top of the walls, and the Mauerlat itself is attached to the rods concreted into the wall. For walls made of brick or reinforced concrete, there is no need to make such a concrete grillage - the wall material itself is quite strong and will withstand any method of fastening the rafter system. It will only be necessary to make two-layer waterproofing around the entire perimeter of the house, and the Mauerlat beam with a cross-section of 150 mm.

To assemble elements of the rafter structure, long nails are used - 150-200 mm. At the corners and at the intersections of load-bearing walls with the internal partitions of the house, it is better to make bolted connections, or use double-sided threaded rods. It is also recommended that all intersections of roof elements be additionally reinforced with metal plates. 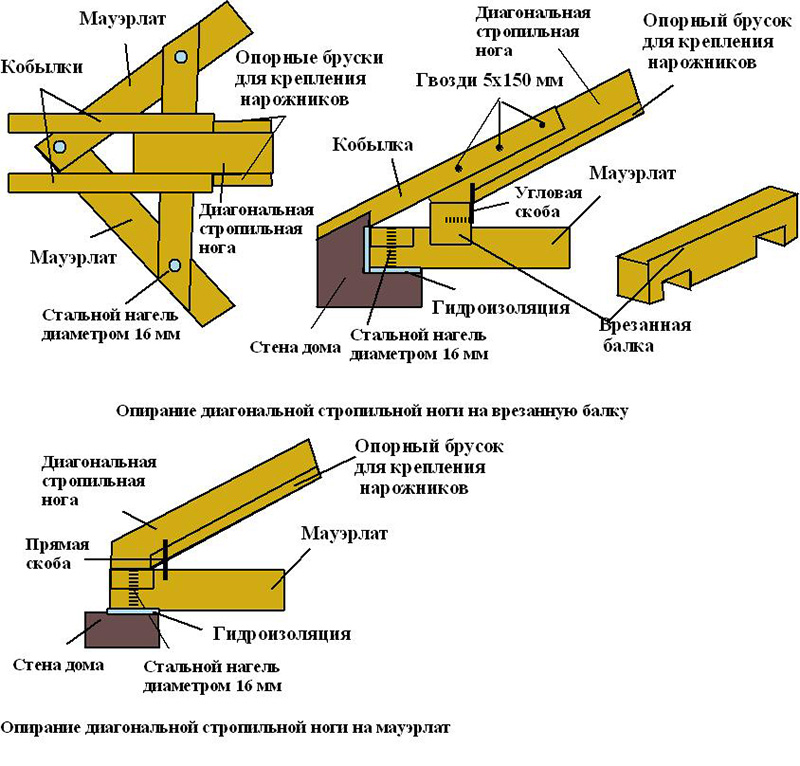
Installation of the attic rafter system can be carried out in two solutions:
- Assembling elements on the ground, lifting finished structural units to the top. First of all, the vertical corner elements are attached, which form the future gables. The remaining elements of the rafter structure are vertically inserted into the grooves made in the Mauerlat timber at a calculated distance and rigidly fixed. To impart rigidity and the correct geometry, you can temporarily secure the elements with spacers and jibs, and after installing the side beams, when the structure acquires the desired rigidity, the spacers can be removed;
- The second method is the sequential assembly of the attic roof on site. It’s more efficient and convenient to work this way, because with a large rafter system, lifting the assembled roof manually will be problematic - you’ll have to rent a crane. After assembling the structure, floor beams are laid, to which vertical beam posts are attached to the grooves, and temporary jibs are installed to provide rigidity and give verticality to the system. Then comes the assembly of the upper and side rafter legs, and the jibs and spacers are mounted in the same way.
The last stage is the installation of the upper beams, which are made according to a template, and grooves for the rafters are immediately cut into them. Since the attic sloping roof does not have a ridge, slopes are mounted on the beam in the middle, which are designed to fix the upper triangle of the attic roof.
A do-it-yourself mansard roof built over a house allows you to increase the total living space with minimal financial investment. The most popular options include a gable sloping roof, the installation technology of which is not complicated.
Project development
By “breaking” the roof slopes at different angles, you can increase the volume of space under the attic roof. The broken structure, like other types of attic roofing, is more massive and heavier than a standard gable roof, which should be taken into account when equipping the attic floor during the process of reconstructing a house. It is first necessary to examine the condition of the foundation and walls of the structure to determine whether they can withstand increased loads. If the installation of a massive attic structure is planned at the stage of preparation for DIY construction, this should be taken into account when developing the design of the foundation and walls of the house.
You should be careful when creating a mansard roof project, since errors in calculations or incorrectly selected parameters of the rafter system elements can lead to damage to the roof itself, and in some cases, to the walls of the house during operation.
It is recommended to entrust the development of a mansard roof project to professionals. It is also possible to use special computer programs that can be used to calculate the optimal roof slope angle and other parameters. All calculations are performed in accordance with the SNiP document “Loads and Impacts”.
When choosing an attic project, the construction of which can be done with your own hands, you first need to pay attention to the dependence of the room parameters on the angle of inclination of the roof. The living space must have a height of more than 2.2 meters. If the roof slopes are straight, then their angle of inclination seriously affects the width of the room.

A broken attic roof allows you to maximize the expansion of the room, providing the required ceiling height along its entire width. In this case, the side (lower) rafters are located at an angle of about 60 degrees, and the angle of inclination of the upper ones can be chosen at your discretion, based on aesthetic preferences, as well as snow and wind loads characteristic of the construction area.
Roofing pie and other elements
If you are planning to make an attic roof with your own hands, it is necessary to include in the project the use of certain materials for installing the roofing pie. They include:
- waterproofing;
- vapor barrier;
- insulation;
- roofing material.
 The choice of insulation affects such a parameter as the pitch of the rafters - in order to save thermal insulation material, it is recommended to position the rafters in such a way that the slab or mat fits tightly between them. The type of lathing (solid or sparse) and the spacing of the sparse lathing depend on the choice of roofing covering. It is worth noting that the installation of the roof of the attic floor provides for the creation of not only high-quality insulation, but also effective ventilation of the roofing system.
Materials and tools
To ensure safety, the construction of the rafter system and roof should be carried out using fireproof, environmentally friendly materials. Wood materials are treated with fire and bioprotection agents.
To build a rafter system for a private house with your own hands you will need:
- wooden beam with a cross section of 50×100 mm;
- board 150×50 mm;
- unedged board;
- 80 nails, self-tapping screws and other fasteners;
- annealed wire (diameter 3-4 mm);
- level;
- plumb line;
- roulette;
- hacksaws;
- axes;
- hammers;
- sharp carpenter's knives.
Using high-quality tools simplifies and speeds up the installation of wooden structures with your own hands. Step-by-step instructions for carrying out the work can be found in the video.
Mauerlat device
The base of the rafter system of the attic roof is a mauerlat made of timber or strong boards. A gable roof requires laying a mauerlat on the long walls of the house. The Mauerlat not only allows you to securely fasten the lower part of the rafters, but also helps to distribute the load evenly when it is transferred to the walls and foundation of the building.
To secure the Mauerlat board or beam, metal pins are used, fixed in a monolithic concrete beam made in the upper part of the wall, or annealed wire embedded in the brickwork. When attaching the Mauerlat to the upper rim of a wooden wall, wooden dowels are used. The installation of a Mauerlat requires high-quality waterproofing of wooden beams. For this purpose, roofing felt or other durable materials with water-repellent properties can be used.

Installation of the Mauerlat is necessary if you intend to build a roof frame with your own hands, the rafters of which rest against the upper part of the wall with a beveled end or a special cutout. If an attic is designed, the width of which actually corresponds to the width of the house, the rafters rest with their lower end against the outer supports. The supports are powerful beams laid across the long walls. The number of supports must correspond to the number of rafter pairs. The beams are attached to the walls in the same way as a Mauerlat, and waterproofing is also used.
The Mauerlat or support beams must be securely fastened to the walls, since these elements prevent the roof from moving under strong wind loads.
Construction of the supporting structure
The construction of the frame of a sloping mansard roof begins with laying supports under the racks, which must be positioned strictly symmetrically relative to the axis of the building. The distance between the supports is equal to the width of the future attic. First of all, U-shaped arches are installed on the gables of the structure. Each arch consists of two support posts connected by a lintel. To make racks, a beam is used, the cross-section of which must be no less than the cross-section of the support underneath.

The racks are installed plumb, strictly vertically. A jumper is attached to them, the horizontalness of which should be checked during installation. Based on the dimensions of the first arch, a second one is made on another front. It is important to level the structure. A cord is stretched between the U-shaped arches, which must be positioned strictly horizontally. If necessary, one of the arches is dismantled and adjusted exactly to size. Focusing on the stretched cord, you should install the remaining arches. Their number and pitch depend on the designed pitch of the rafters, since the upper end of each rafter is attached to the corresponding rack. This provides the necessary rigidity of the attic roof frame.

The uprights of U-shaped arches can be attached to the support with metal brackets, nails or tenon joints. You can learn about the main methods of connecting rafter structure elements from the video instructions. To ensure the verticality of the racks under the load that the roof will experience during operation, it is recommended to additionally install braces. The arches in the upper part are connected to each other by lintels parallel to the long walls of the house.

Installation of rafter legs
Do-it-yourself construction of a sloping roof involves the use of two types of rafter legs. The lower rafters are located at a very acute angle, connecting the racks to the Mauerlat or the ends of the outer transverse supports. The upper gable rafter structure is mounted on an arched system.
Before installing the lower rafter legs, you must carefully mark the location of their installation on the Mauerlat. The rafters closest to the gable are installed first. Trimming the rafter legs is carried out in such a way that the cut of the upper edge of the board fits at the required angle to the stand, and the lower cut rests against the mauerlat or remote support. If, according to the project, the attic roof is made with overhangs, a specially shaped cutout is made in the lower part of the rafter leg: with the horizontal part of the cutout, the rafter rests on a support. The rafter is secured with nails or staples. It is recommended to additionally strengthen the connections of the legs with the Mauerlat or external support with burnt wire with a diameter of 3-4 mm. All lower rafters are installed according to a similar scheme.

If we are building a house whose length exceeds 8 meters, it is recommended to install a rafter system with ridge beams. This device allows you to evenly distribute the load over the entire frame. In this case, racks are installed in the center of the gables, the verticality of which is checked with a plumb line, and a ridge beam is mounted strictly horizontally on them. It is important to correctly determine the height of the ridge, since the angle of inclination of the upper rafters directly depends on this. The rafter legs rest against the ridge beam with their upper cut ends, and with their lower ends against the supporting arched structure.

The upper rafters of the attic roof can be an L-shaped structure. The rafter legs can be connected end-to-end using a wooden or metal fastening plate, or by cutting into half a tree using a bolted connection. It is recommended to fit the first pair of rafters locally, which are then dismantled and used as a template. The prepared trusses are installed in the standard order - first the outer ones, then the rest with constant leveling.
At the last stage of creating a roof structure with your own hands, you install the sheathing, lay down the waterproofing, create a ventilation gap, and install the roof covering. Thermal insulation and vapor barrier are attached from the inside, and the sheathing is attached. In the video you can get acquainted with the technology of work in detail.